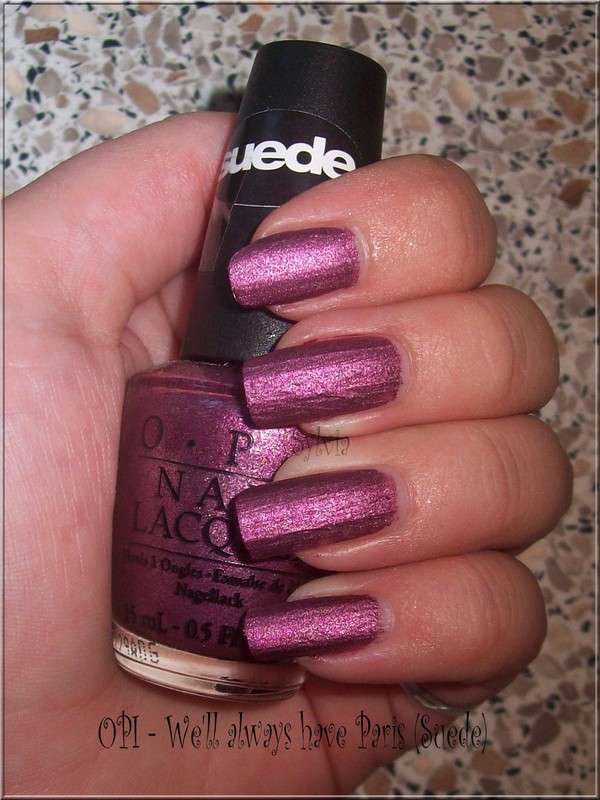
Vandaag ga ik een lakje van OPI laten zien, namelijk We'll Always Have Paris (Suede). Je zult ongetwijfeld niet heel veel OPI op mijn blog voorbij zien komen, dit is omdat ik niet van die goede ervaringen met OPI heb. Toen ik voor het eerst mn eerste 4 OPI lakjes kreeg kon ik absoluut niet met het kwastje overweg, vond hem véél te breed, tegenwoordig hebben meerdere merken brede kwastjes, dus kan er inmiddels al beter mee overweg. Ik begin nu trouwens weer iets meer vertrouwen in OPI te krijgen, dus wie weet komt er binnenkort wel meer over!
Today I'm going to show you an OPI polish, it's We'll always have paris (Suede). I don't show much OPI, this is because I'm not really blown away by this brand. When I bought my first OPI polishes I hated the wide brush.. Lately more brands have a wide brush, so I don't hate the brush from OPI anymore, and I can handle it better lately. So maybe I'm going to buy some new OPI polishes when I see really nice polishes!
We'll always have Paris is dus de Suede uitvoering, ik heb deze al eerder eens gedragen en toen vond ik hem niet mooi, ook begon hij dezelfde dag nog te chippen.. Toen ik hem afgelopen week opdeed viel het me op dat het toch eigenlijk wel een heel mooi/speciaal lakje is!
We'll Always Have Paris is a Suede Polish, I used this one before, but then I didn't really like the polish, he started to chip the same day.. When I wear it last week I noticed that I do like the polish!
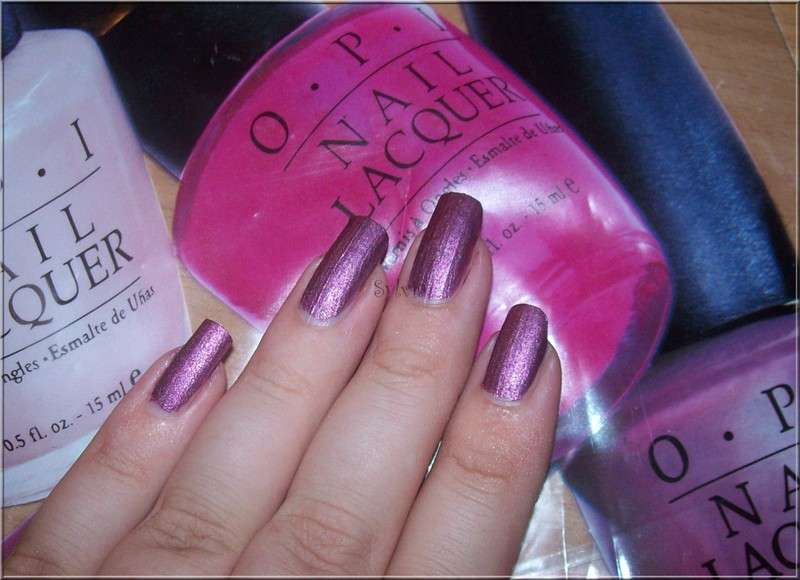
Deze lak is dus paars suede, ofwel hij droogt mat op. Op het bijgesloten kaartje staat ook dat je geen basecoat en geen topcoat mag gebruiken. Alhoewel dat er dus opstaat gebruik ik wel gewoon basecoat, geen topcoat omdat dit dus het effect weer glimmend maakt ipv suede.
This is a Purple Suede polish, it's dries matte. The card, which was on the bottle says that you can't use a base or topcoat with this polish. I used a basecoat, but no topcoat, with topcoat you make the polish shiny instead of suede.
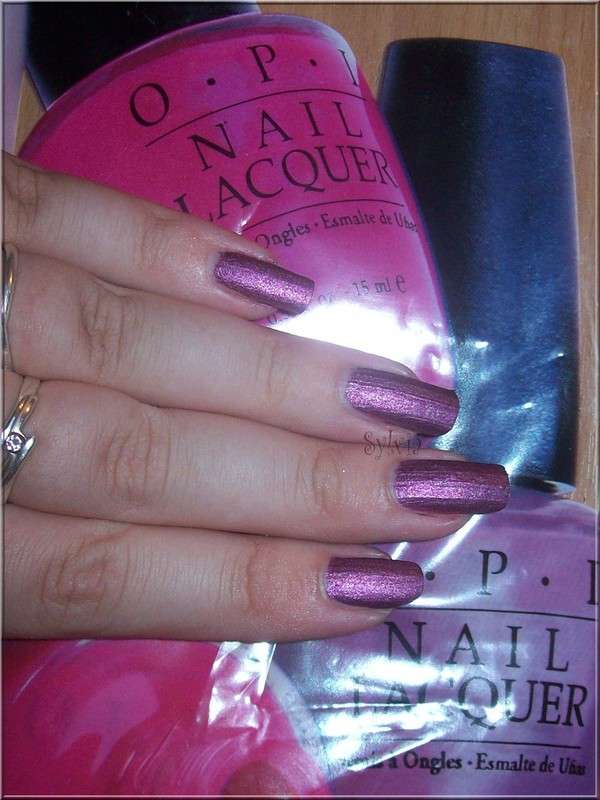
Applicatie is absoluut niet mijn favoriet. Omdat deze lak mat opdroogt droogt hij enorm snel, je moet dus heel snel lakken. Wat bij mij tot problemen liep dat ik op sommige nagels een beetje een ophoping/lelijk stuk kreeg. Ook heb je echt 2 laagjes nodig, met 1 laagje is hij erg streperig en zie je door de strepen je nagels nog. Er staat overigens wel netjes bijgegeven dat de Suede lakken niet zo langhoudend zijn als de gewone OPI lakjes.
Application isn't really my favorite. Because this is a suede polish which dries matte, it's dries very fast, you'll have to polish really fast. So I had some troubles with the application, sometimes I was too slow on some nails, so I've got some accumulations/ugly parts on my nails. You'll need absolutely 2 coats for this polish, after 1 coat it's very streaky, and through the streaks you'll see your nails through. Included with the polish is the message that Suede Polishes don't last that long as normal OPI polishes do, so that's really honest!
Thanks for stopping by!
donderdag 30 september 2010
woensdag 29 september 2010
Essence - My Boyfriend's Jeans
My Boyfriend's Jeans is het tweede lakje uit de Denim Collectie van Essence welke ik heb. Ook deze hebben jullie al voorbij zien komen in de mini haul, dus vandaag is het tijd om de swatches te laten zien!
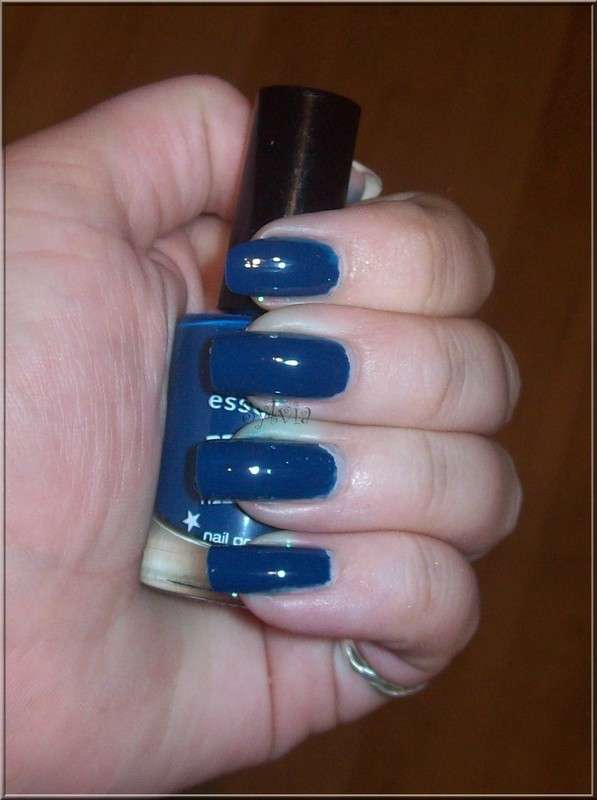
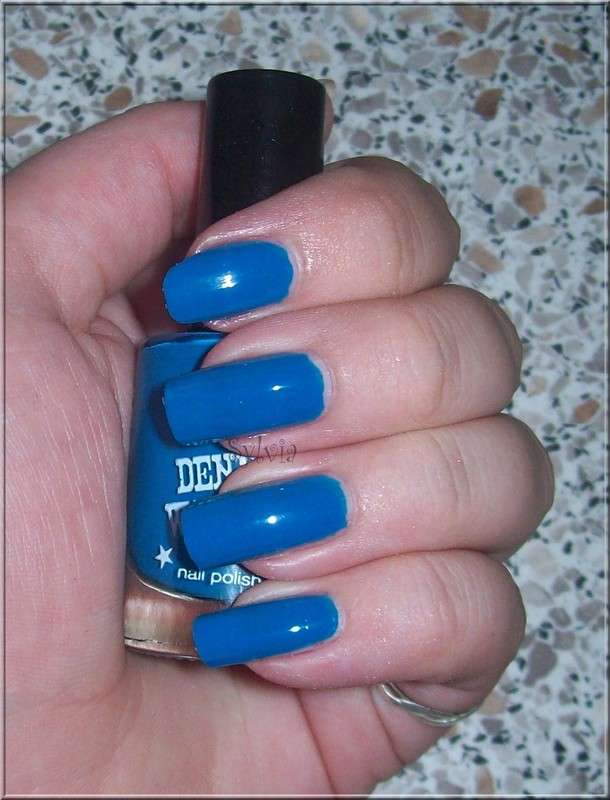
Dit is dus My Boyfriend's Jeans van Essence. Deze is een stuk donkerder dan Forever Mine is. Dit is een jelly lakje, de substantie loopt echt richting jelly. Ik vond dit eerst echt een hmm hmm kleurtje. Maar nu ik er een beetje aan gewend bent is dit eigenlijk wel een heel mooi winterkleurtje. Vind hem absoluut niet geschikt voor de zomer, dan draag ik liever wat meer knalkleur, maar het wordt nu toch snel weer winter, dus dan is deze perfect!
So this is My Boyfriend's Jeans from Essence. This one is a lot darker than Forever Mine is. The polish is jelly, the substance is really more jelly than creamy. My first thoughts were hmm hmm, but now I'm used to it and I think it's a really great polish for the winter! I absolutely not going to wear this polish in summer, in summer I like very bright colours, but soon it's turning winter, so this polish is perfect!
Applicatie van deze lak is ook prima, doordat de substantie wat jelly is dekt hij na 2 dunne laagjes al erg mooi. Ik ben al helemaal klaar voor de winter met dit donkere lakje!
Application is really good, because the substance is jelly like, you only need two thin coats for full coverage. I'm ready for the winter with this polish!
Hebben jullie al lakjes klaar staan voor de winter? / Do you have special nailpolishes for the winter?
dinsdag 28 september 2010
Notd Sunflowers.
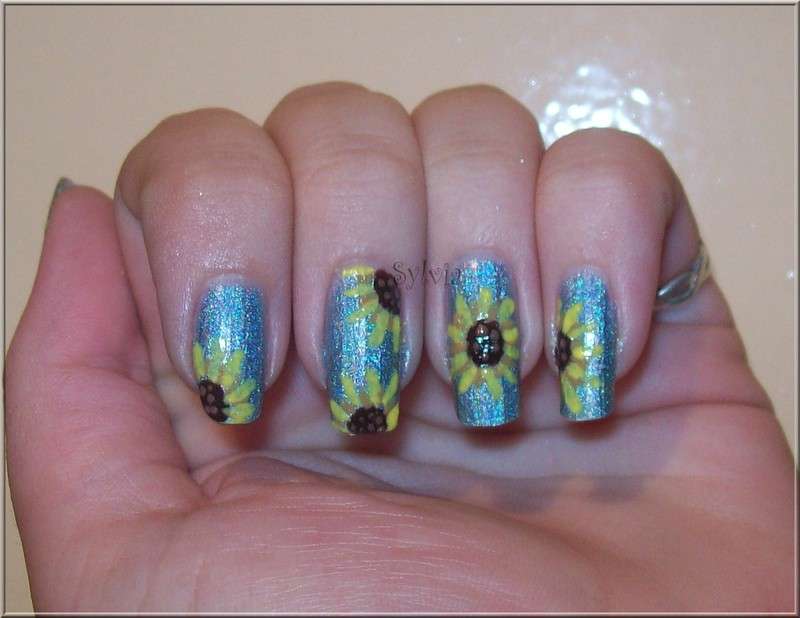
Deze week ben ik nog gezellig in een zomerse bui. Afgelopen week besloot ik om zonnebloemen op mn nagels te gaan maken. Dus zo draag ik in deze sombere dagen toch nog een beetje zon mee!
I'm in a real sunny mood this week. Last week I decided to create some sunflowers on my nails. So I'm bringing these bad weather days through with sunny nails!
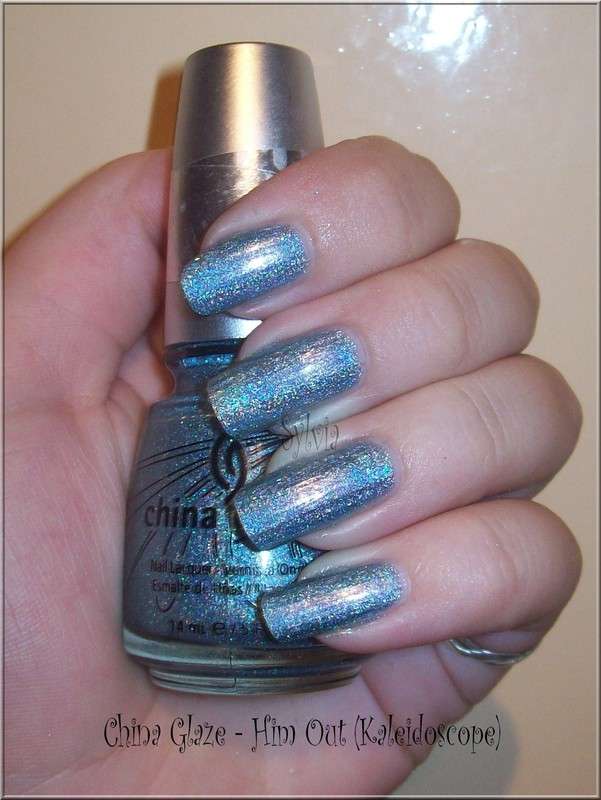
Als basiskleur heb ik China Glaze - Him Out ( uit de kaleidoscope collectie genomen). Dit lakje staat echt in mijn top 3 van favoriete lakjes. Ik ben echt gek op holografische lakjes! Alleen toch wel jammer dat er nu geen zon meer is om het heerlijke holografische effect te bekijken... Applicatie van deze lak is prima, je hebt enkel wel 3 laagjes nodig zodat je geen VNL hebt. Ik had het eventueel met 2 laagjes ook gekund, omdat er nailart overheen komt, maar toch ben ik dan meer van het doe er maar een extra laagje op ;)
For the basecolour I used China Glaze - Him Out ( From the kaleidoscope collection). This one is really a polish from my top 3 favourite polishes. I really love holographic nailpolishes! Too bad that there isn't any sun to see the holographic effect... Application is good, you only need three coats or else you've got a VNL. When you're doing nailart over this one you can use 2 layers, with nailart you can't see a VNL. But I'm a person who took just 3 coats ;)
Vervolgens heb ik op iedere nagel een zonnebloemontwerpje gemaakt, ik wilde niet saai op iedere nagel precies in het midden de zonnebloem, dus ik heb ervoor gekozen om ze afwisselend in het midden en op een hoek van mn nagel te maken.
Up next I made a sunflowercreation on every nail, I didn't want the boring effect from every nail the same boring sunflower. So I choose to make every nail different with the same flower, now I like it better!
Ik wordt in ieder geval weer lekker vrolijk van mn nagels! De blaadjes van de zonnebloem heb ik afwisselend geel en licht bruinig gemaakt. De geel heb ik dus gewoon gemixt met de donkerbruin van het middenstipje, je kunt ook gewoon een oranjeachtige lak gebruiken of een lichtbruin lakje.
I became happy with my nails! The petals from the flowers are made with yellow and a mix from the darkbrown with the yellow. You can take a orange like polish or just a light brown polish instead of mixing colours.
I'm in a real sunny mood this week. Last week I decided to create some sunflowers on my nails. So I'm bringing these bad weather days through with sunny nails!
For the basecolour I used China Glaze - Him Out ( From the kaleidoscope collection). This one is really a polish from my top 3 favourite polishes. I really love holographic nailpolishes! Too bad that there isn't any sun to see the holographic effect... Application is good, you only need three coats or else you've got a VNL. When you're doing nailart over this one you can use 2 layers, with nailart you can't see a VNL. But I'm a person who took just 3 coats ;)
Vervolgens heb ik op iedere nagel een zonnebloemontwerpje gemaakt, ik wilde niet saai op iedere nagel precies in het midden de zonnebloem, dus ik heb ervoor gekozen om ze afwisselend in het midden en op een hoek van mn nagel te maken.
Up next I made a sunflowercreation on every nail, I didn't want the boring effect from every nail the same boring sunflower. So I choose to make every nail different with the same flower, now I like it better!
Ik wordt in ieder geval weer lekker vrolijk van mn nagels! De blaadjes van de zonnebloem heb ik afwisselend geel en licht bruinig gemaakt. De geel heb ik dus gewoon gemixt met de donkerbruin van het middenstipje, je kunt ook gewoon een oranjeachtige lak gebruiken of een lichtbruin lakje.
I became happy with my nails! The petals from the flowers are made with yellow and a mix from the darkbrown with the yellow. You can take a orange like polish or just a light brown polish instead of mixing colours.
Labels:
China Glaze,
Handmade Nailart,
Notd
maandag 27 september 2010
Essence - Forever Mine
Forever Mine is een lakje uit de Denim Collectie van Essence. Ik liet dit lakje al zien in mn laatste minihaul, en vandaag ga ik jullie de swatches van deze lak laten zien! Normaal gesproken doe ik de collecties van Essence allemaal samen in 1 post, maar omdat ik dit keer uit de LE maar 2 lakjes gehaald heb ga ik deze gewoon apart laten zien.
Forever Mine is a polish from the Denim Collection from Essence. I showed this polish a few days ago in my minihaul, and today i'm going to show you the swatches from this polish! Normally I swatch all the polishes from a LE in one post together, but I've got only 2 polishes from the LE this time, so I'm going to post them both in a own post.
Bovenstaande foto is gemaakt buiten in normaal licht (geen zon, die is niet echt meer aanwezig) en zonder flits. Forever Mine is een mooi diep blauw kleurtje. Het is echt een cream lakje, dus er is geen shimmer of dergelijks aanwezig. Dat is toch ook wel iets wat deze mooi maakt, hij is mooi genoeg zo!
Above photo is made outside in daylight (Not sunlight, the sun isn't here very often) and without flash. Forever Mine is a beautiful deep blue polish. It's definitely a polish with cream finish, so there isn't any shimmer whatsoever. That's something that makes this polish really pretty!
Bovenstaande foto is binnen gemaakt met flits. Hier ziet de kleur er ietsies donkerder uit, maar het scheelt niet veel vergeleken met de buitenfoto. Applicatie is ook prima, de lak heeft een lekkere samenstelling, dus is niet heel dik en ook niet heel dun. Na 1 laagje zie je nog wat nagel erdoorheen, dus zeker 2 laagjes nodig om deze mooi dekkend te krijgen. Verder ben ik er heel tevreden over! Zeker over de prijs, deze kostte €1,79 en is verkrijgbaar bij de Kruidvat en Trekpleister.
Above photo is made inside with flash. The colour is a little bit darker her, but it's not a big difference with the pic made outside. Application is also good, the polish got a nice structure, so it isn't very thick, and not very thin. You've got 2 layers for this one for a complete coverage, after 1 coat you've got a VNL (Visible Nail Line). Further I'm very pleased with this polish, it's really good for the price you pay for it, it's €1,79 and you can buy it in the Kruidvat and Trekpleister (In the Netherlands).
Thanks for stopping by!
Labels:
Essence
zondag 26 september 2010
La Femme Beauty - Ultra Rasberry
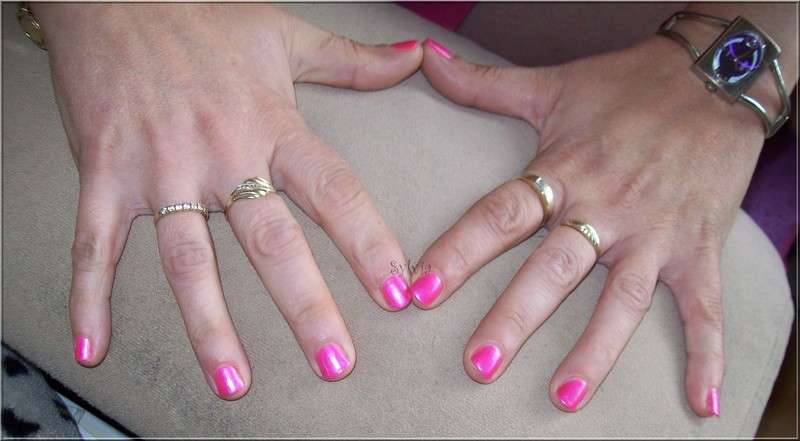
La Femme Beauty - Ultra Rasberry is een lakje welke uit de fluorcollectie van La Femme Beauty komt. Het is dus echt een heerlijk knalkleurtje welke van je nagel knalt. En nee ik heb geen handentransformatie ondergaan hoor ;) Dit zijn idd mijn handen niet.. Ik lak zo afentoe de nagels van mn moeder, maar normaal gesproken maak ik daar bijna nooit foto's van. Mn moeder wilde dit keer dus haar one post of fame op mn blog. Dus bij deze!
La Femme Beauty - Ultra Rasberry is a polish from the Fluor collection from La Femme Beauty. It's a really bright polish it just pops from your nails. Oh and no, I didn't have a handchanging ;) These aren't my hands or my nails.. Often I polish my mom's nails, but normally I don't make pics of it. But my mom wanted her one post of fame on my blog. So here it is!
Ultra Rasberry is een echt felroze kleurtje. Heel vrolijk en hij geeft ook wel een beetje een zomers gevoel, het gevoel wat wij allemaal wel nodig hebben met het slechte weer momenteel. Applicatie is prima, na 1 laagje dekt hij al behoorlijk, maar met een tweede laagje erover is hij net iets mooier, hier heb ik dus ook 2 laagjes gebruikt. Houdbaarheid is trouwens ook goed, deze bleef bij mijn moeder ruim 3 dagen goed zitten, terwijl lakjes bij haar altijd na 1 dag al behoorlijk gechipt zijn.
Ultra Rasberry is a really bright pink polish. Very happy and it gives a summerfeeling, something what I really need with this bad weather.. Application is good, after 1 layer it's opaque, but it's better to use 2, the result is with 2 layers just a bit nicer, I used 2 layers too. Sustainability is good too, this polish lasts for 3 days on my mom's nails, normally every polish chips after 1 day on her nails.
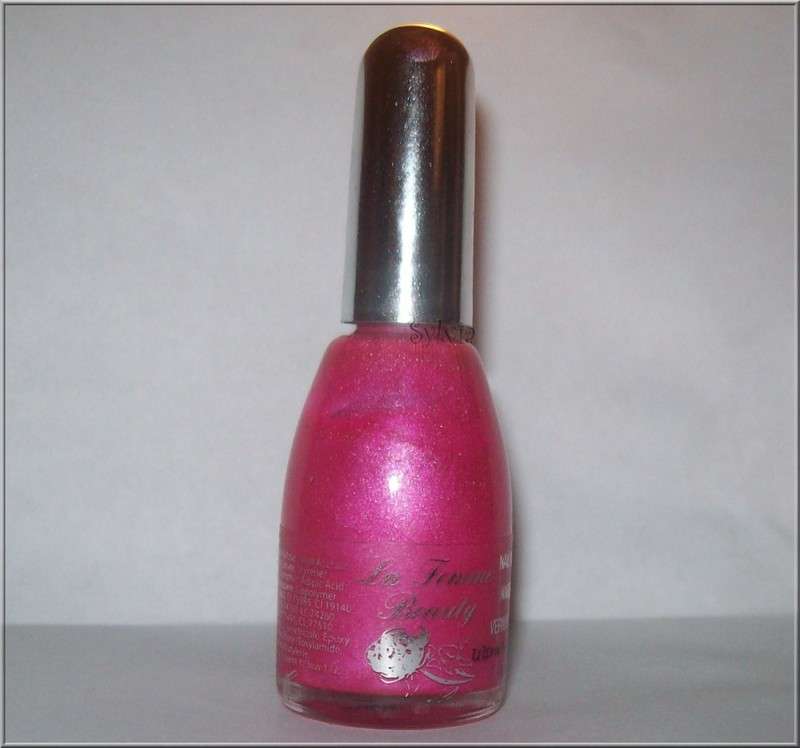
En voor de geïnteresseerden die graag willen weten hoe het flesje eruit ziet! / For the ones who wanted to know how the bottle looks like!
Dus hou jij ook van mooie roze kleurtjes? Deze is écht een aanrader voor alle roze liefhebbers!/ So when you love pink polishes, this one is really recommended for the pinklovers!
Labels:
La Femme Beauty
zaterdag 25 september 2010
Mini Haul!
Na een lange tijd weer eens een Haul tussendoor. Meestal als ik ga shoppen haal ik niet zoveel tegelijk, dus deze haul is van ongeveer 2/3 weken geleden tot vandaag. Ik heb ook eindelijk het lakje Choose Me kunnen halen! ( Dé dupe van Zoya - Charla!).
After a long time, a shop haul again! Mostly I don't buy a lot of things, so this haul is from 2/3 weeks ago until today. I finally found Essence - Choose Me today! (Thé dupe of Zoya - Charla!).
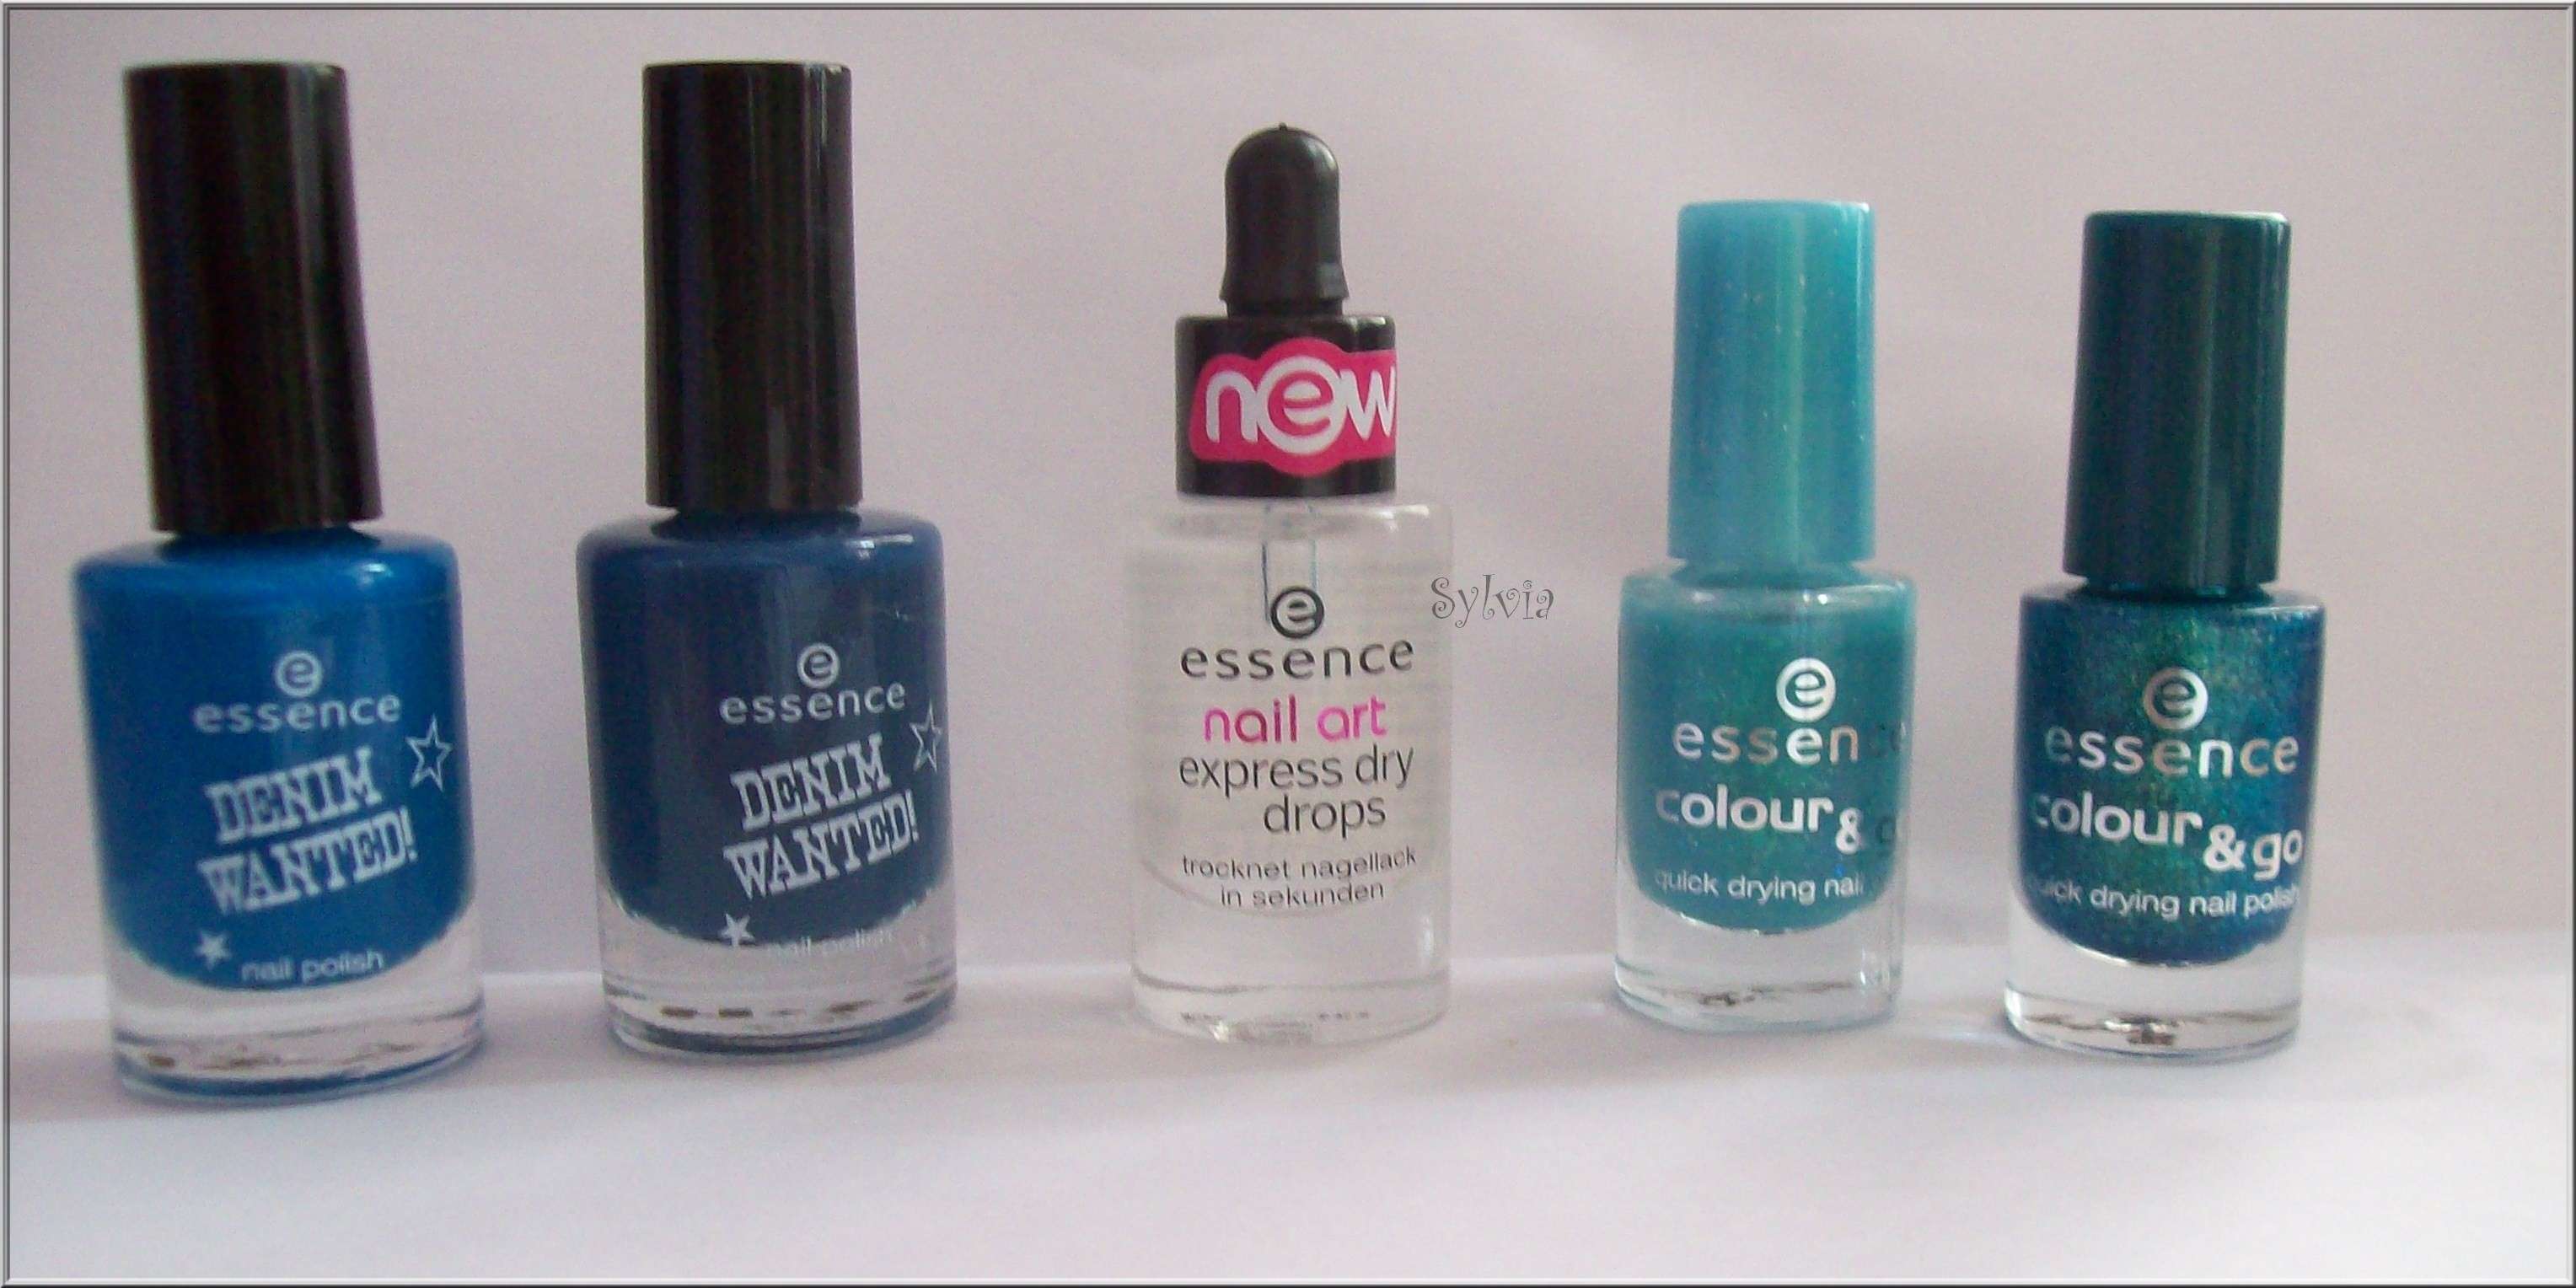
Dit zijn de nieuwe lakjes, 2 lakjes uit de Denim Wanted collectie, Essence Nail art Drops, en 2 lakjes van de Colour & Go collectie. De laatste lakjes vind ik de laatste tijd trouwens enorm vooruit gaan! 2 Jaar geleden waren de Colour & Go lakjes absoluut bagger, maar de laatste tijd ben ik er enorm tevreden over! Ook de nieuwe kleurtjes! (Ben wel in een blauwe bui vandaag he? Haha!). Van links naar rechts nog even de namen: Forever Mine, My Boyfriend's Jeans, de drops, Glisten Up en Choose Me!
These are the new polishes, 2 polishes from the denim wanted collection, Essence Nailart Drops, 2 new polishes from the colour & Go collection. The last polishes are really making forwarts last times! 2 Years ago the colour & go polishes were crap, but now they're pretty good! The new colours are awesome too! (Hmm I'm in a blue mood today I think, all the polishes are blue!) From left to right the names: Forever Mine, My Boyfriend's Jeans, The Drops, Glisten up and Choose Me.
Forever Mine, My Boyfriend's Jeans en Glisten up heb ik al geswatcht, deze komen deze week nog online. De druppels ga ik een tijdje uitproberen voordat ik er een duidelijke mening over kan vormen, over een tijdje zal ik hier dus een review over schrijven. Choose Me zal ongetwijfeld binnenkort ook geswatcht worden!
I already swatched Forever Mine, My Boyfriend's Jeans and Glisten up, so these swatches are coming this week online on my blog. I'm going to try out the drops for a time, after that I'm going to write a clear review with my opinion. I'll swatch Choose Me next week!
Oh en kijk mn nieuwe aapje! Schattig he! :)/ Oh look at my new monkey! Isn't he adorable! :)
vrijdag 24 september 2010
La Femme Beauty - Rich Pink Cream
Vandaag weer eens een 'pedicure' tussendoor. In Holland is het echte zomerweer eigenlijk al over, maar dit weerhoud mij er niet van om gewoon mn teennagels nog te lakken, kale teennagels vind ik niks, dus ook in de winter en koudere periodes lak ik mijn teennagels!
Today a 'pedicure'. In the Netherlands the summer is over, but this is not a reason for not polishing my toenails, I hate naked nails! So I polish them in fall and winter too.
Deze keer heb ik Rich Pink Cream van La Femme Beauty gebruikt. Laatst had ik ook een lakje van La Femme Beauty op mn teennagels, en deze heeft er ruim 7 weken perfect opgezeten (Zie hier). Dus daarom de keuze om weer een La Femme Beauty lakje te nemen. Rich Pink Cream is zoals de naam al een beetje verklapt een donkerroze lakje, ook heeft deze een creamy finish. Applicatie is perfect, ik heb hierboven maar één laagje gebruikt!
This time I took La Femme Beaty - Rich Pink Cream. Last time I had my toenails done with another La Femme Beauty polish, and it lasted for 7 weeks perfectly! So I thought I take a polish from the same brand. Rich Pink Cream is as the name says, a dark pink polish with a cream finish. Application is great, on my toenails just one layer!
Hierboven een foto van beide voeten, ik vind het een erg leuk kleurtje! Trouwens nee ik heb geen 4 tenen :p Mn kleine teen zit verstopt achter een bandje!
Above a pic with both feet, I really like the colour! By the way: No I don't have only 8 toes, my little toes are hiding behind a strap!
Hoe zit het met jullie? Lakken jullie je teennagels enkel in de zomer, of gaan jullie net zoals ik het hele jaar door?/ What about you? Do you polish your nails the whole year, or only in the summer?
Labels:
La Femme Beauty,
Toenails
Notd: Owls
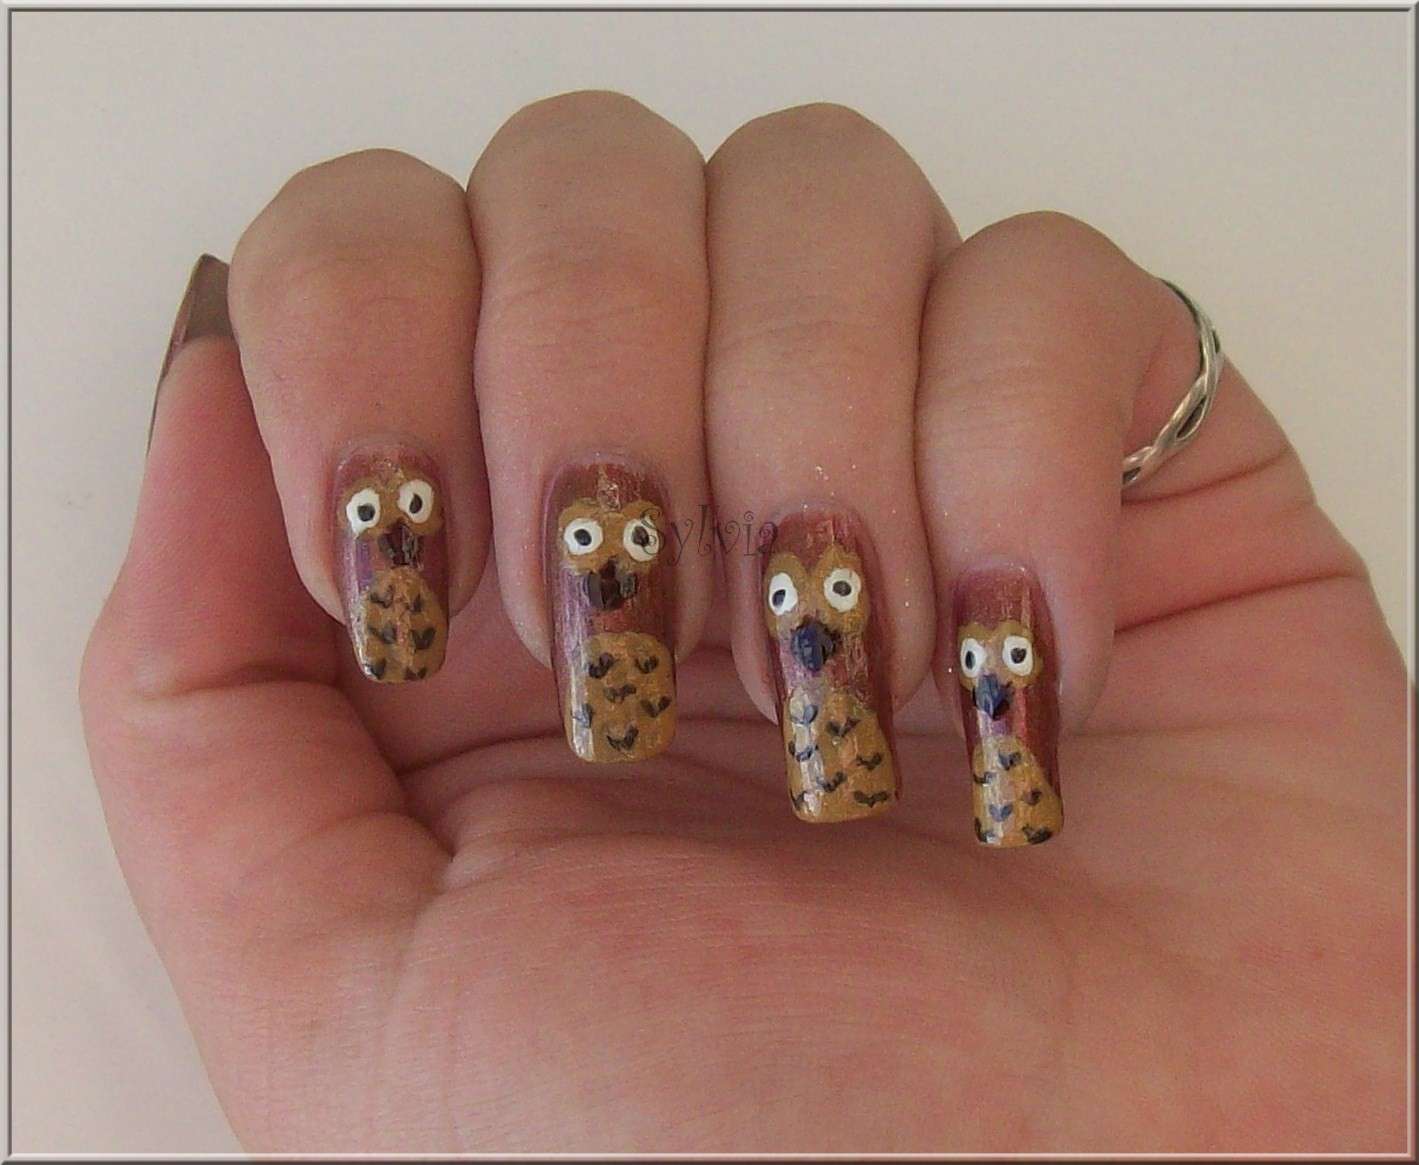
Vandaag weer eens een Notd, een Notd die ik zelf erg leuk geworden vind (alhoewel de foto's dat niet helemaal tot zijn recht brengen). Een notd die ook enorm lang is blijven zitten, 2 weken heeft deze op mn nagels gezeten, en na 1 week had ik enkel chips op mn duim (en dit kwam meer door het afbreken van mn duimnagel). Bleef perfect zitten dus! Kijk mee!
Today a Notd again, this is a notd I really like ( But the pics aren't very great with this notd). A notd which stood for a really long time on my nails, for almost 2 weeks. I've got only some little chips on my thumbnail (But that's because my thumbnail broke). So it was for a long time on my nails! Scroll down to see the notd!
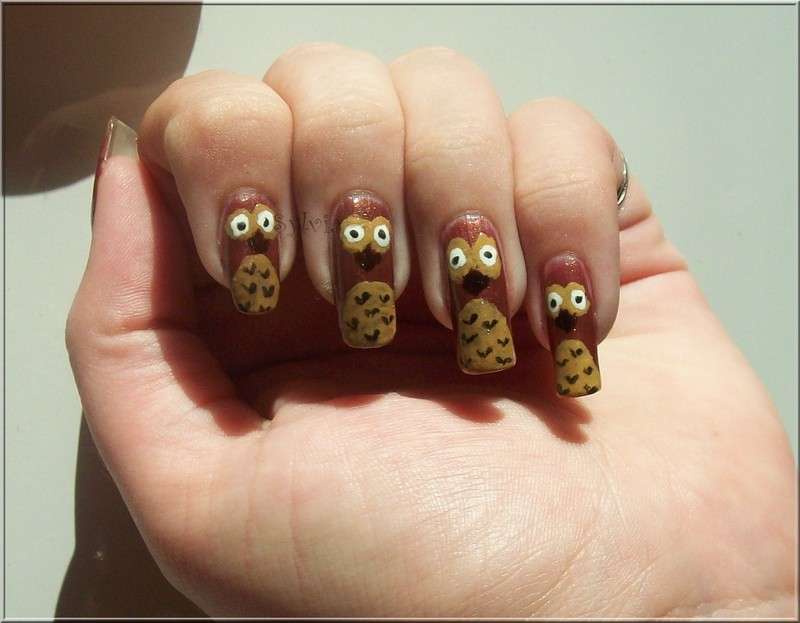
En dit is de Notd, lieve uiltjes! Deze foto is toevallig wel nog in de zon gemaakt, ben bang dat dat de laatste keer zon was voor ons. De lichtbruine kleur heb ik gemengd met Jungle Drum van Essence en de gele lak van LUCIDarling, een lichtbruine lak heb ik vast wel in mn stash, maar op dat moment had ik even geen zin om te zoeken. :)
And this is the Notd, sweet owls! This pic is made in sunlight (I think that's the last sun we saw in Holland this year...) The light brown colour is mixed with Jungle Drum from Essence and the yellow polish from LUCIDarling, I think i've got a lightbrown polish, but I just hadn't the mood for searching. :)
En bovenstaande foto is gemaakt in de schaduw, ondanks dat de creatie er na 2 weken nog perfect op zat moest ik hem er wel afhalen aangezien de lak erg begon uit te groeien, dus kreeg wat kale randjes aan de bovenkant. Op naar een nieuwe creatie dus! Oh de nieuwe creatie wordt ook met iets kortere nagels, een klein stukje van mn wijsvingernagel was afgebroken, dus maak ze allemaal weer wat korter.
And above pic is made in the shade, despite that the creation was still nice after 2 weeks sitting on my nail, I had to take it off because the polish grows out, I've got huge naked nails above the creation. So go to the next Notd! Oh the next one is on shorter nails, a bit of my indexnail broke, so I filed them down a bit.
Thanks for reading!
Today a Notd again, this is a notd I really like ( But the pics aren't very great with this notd). A notd which stood for a really long time on my nails, for almost 2 weeks. I've got only some little chips on my thumbnail (But that's because my thumbnail broke). So it was for a long time on my nails! Scroll down to see the notd!
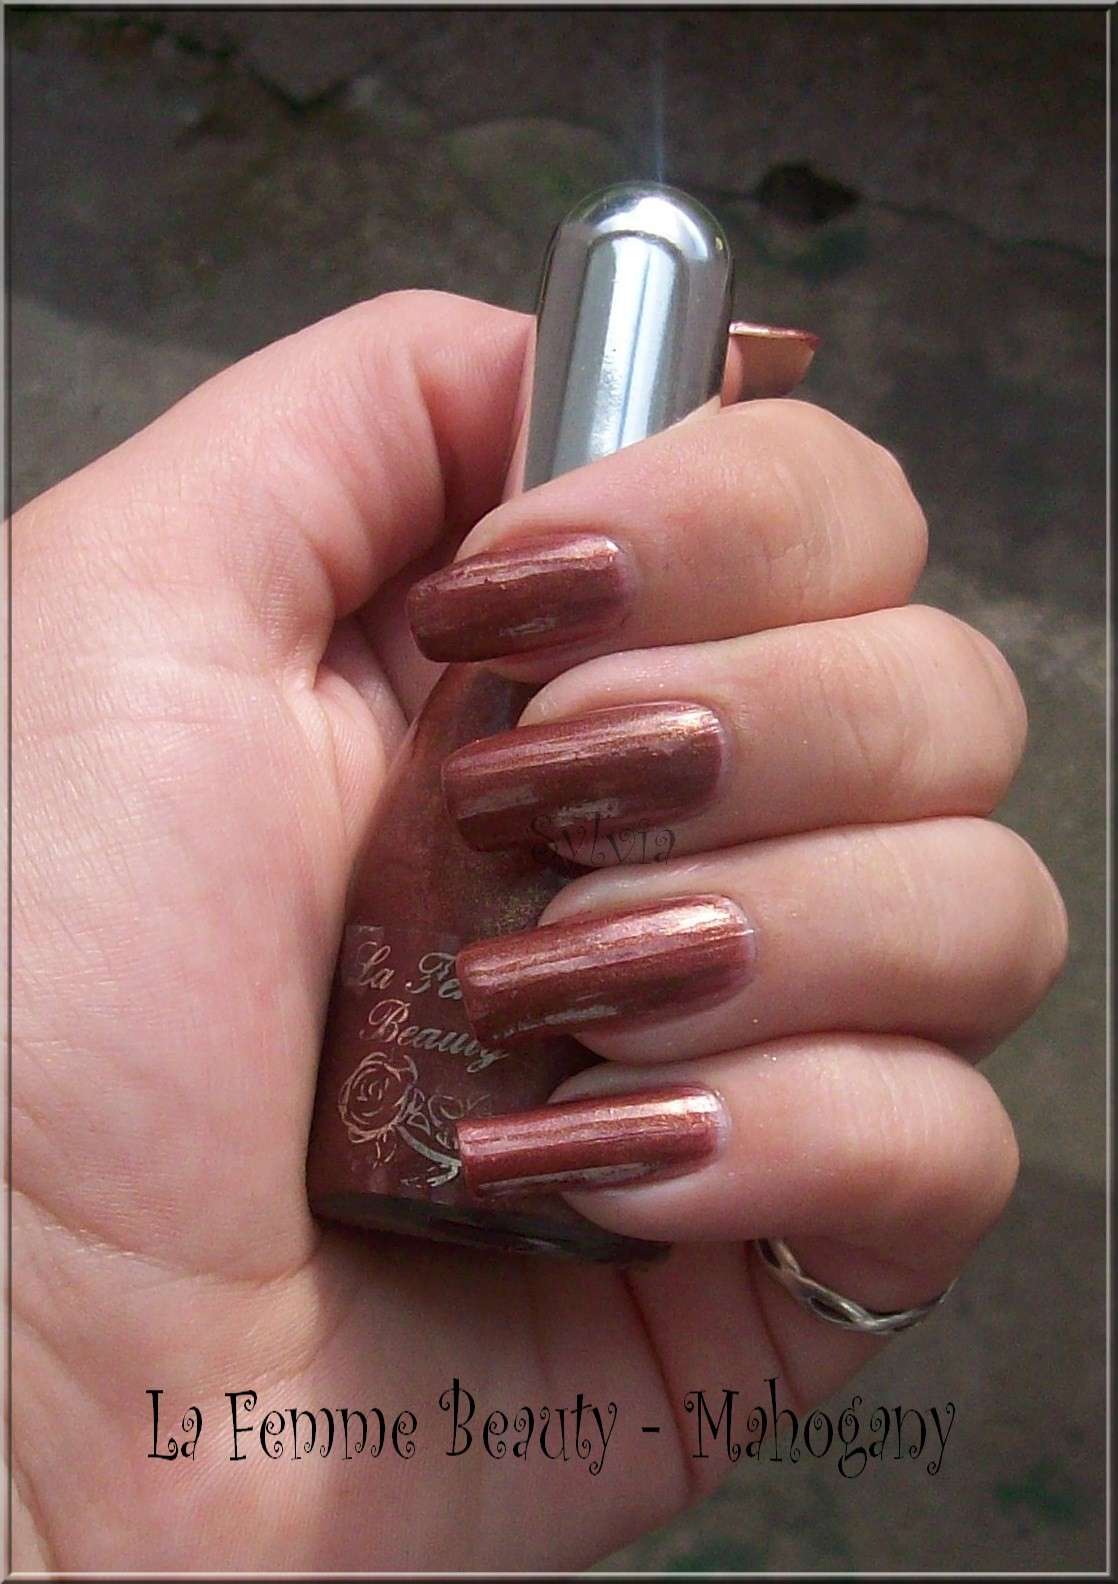
Als basiskleur heb ik Mahogany van La Femme beauty gebruikt. De eerste keer dat ik een bruingetinte kleur als volle manicure op mn nagels gehad heb! Dit is zoals de naam al zegt een mahoganybruin kleurtje met gouden shimmer. De shimmer is helaas moeilijk te zien, hiervoor moet je hem echt in het zonlicht houden, maar aangezien de zon in Holland weer erg ver te zoeken is..
As the basecolour I used La Femme Beauty - Mahogany. The first time I used a brownish colour as a whole manicure on my nails! This is as the name said, a mahoganybrown polish with golden shimmer. Shimmer is hard to notice, you can only see it in sunlight, but unfortunately in Holland there's no sun anymore..
And this is the Notd, sweet owls! This pic is made in sunlight (I think that's the last sun we saw in Holland this year...) The light brown colour is mixed with Jungle Drum from Essence and the yellow polish from LUCIDarling, I think i've got a lightbrown polish, but I just hadn't the mood for searching. :)
En bovenstaande foto is gemaakt in de schaduw, ondanks dat de creatie er na 2 weken nog perfect op zat moest ik hem er wel afhalen aangezien de lak erg begon uit te groeien, dus kreeg wat kale randjes aan de bovenkant. Op naar een nieuwe creatie dus! Oh de nieuwe creatie wordt ook met iets kortere nagels, een klein stukje van mn wijsvingernagel was afgebroken, dus maak ze allemaal weer wat korter.
And above pic is made in the shade, despite that the creation was still nice after 2 weeks sitting on my nail, I had to take it off because the polish grows out, I've got huge naked nails above the creation. So go to the next Notd! Oh the next one is on shorter nails, a bit of my indexnail broke, so I filed them down a bit.
Thanks for reading!
woensdag 22 september 2010
LUCIDarling Fantastic Nails #06
Begin deze maand liet ik jullie al de lakjes van LUCIDarling zien. (Nieuwsgierig? Klik hier!) Vandaag ga ik jullie een van deze lakjes laten zien met swatches. Het gaat om LUCIDarling Fantastic Nails #06, hij komt dus of uit de glitter of uit de shimmer serie (Aangezien de andere series maar 4 lakjes hebben). Kijk verder om erachter te komen of dit een meer shimmer of toch een meer glitterig lakje is!
This month I started with the polishes from LUCIDarling. (Curious? Click here!) Today I'm going to show you one of these polishes with swatches. It's about LUCIDarling Fantastic Nails #06, it's from the shimmer or the glitter categorie ( The other 2 only got 4 polishes each). Scroll down to look at the polish and to see if this polish is more shimmer, or more glitter.
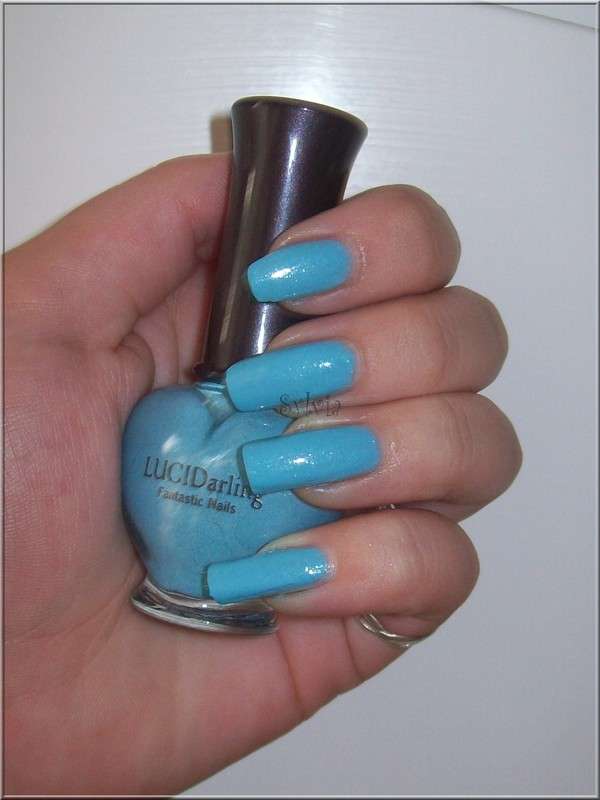 #06 is een mooi lichtblauw kleurtje, zoals je kunt zien zit er meer glitter in dan echt shimmer. In real life is de glitter veel beter te zien.. Deze foto is binnen met flits gemaakt. Applicatie is heerlijk, lekker kwastje en mooie dekking met 1 laagje, op de foto heb ik wel 2 laagjes gebruikt omdat ik dat vaak toch net ff wat mooier vind staan.
#06 is a really pretty light blue colour, as you can see it's more glittery than shimmer. In real life there's much more glitter, but it's hard to see on the pic. Application is great, really nice brush and opaque in one coat, I used 2 on this pic.
 Bovenstaande foto is buiten in het zonnetje zonder flits gemaakt. Hier zie je geen enkele glitter meer! En lijkt de lak zelfs boobbelig op bepaalde plekken. Schijn bedriegt want dat is helemaal niet zo, en er zitten superveel heerlijke glittertjes in deze lak! Oh het enige minpuntje aan deze lak is het verwijderen van de lak, mn handen waren compleet blauw!
Above photo is made outside without flash. As you can see there's no glitter on this pic, and also the polish looks a bit bumpy. But it's not what it looks like, there are so many nice glitters in there! Oh there's one little disadvantage, removing the polish. It's a hell, my whole hands and nails were blue!
Thanks for reading, and enjoy the nice weather outside!
This month I started with the polishes from LUCIDarling. (Curious? Click here!) Today I'm going to show you one of these polishes with swatches. It's about LUCIDarling Fantastic Nails #06, it's from the shimmer or the glitter categorie ( The other 2 only got 4 polishes each). Scroll down to look at the polish and to see if this polish is more shimmer, or more glitter.
 #06 is een mooi lichtblauw kleurtje, zoals je kunt zien zit er meer glitter in dan echt shimmer. In real life is de glitter veel beter te zien.. Deze foto is binnen met flits gemaakt. Applicatie is heerlijk, lekker kwastje en mooie dekking met 1 laagje, op de foto heb ik wel 2 laagjes gebruikt omdat ik dat vaak toch net ff wat mooier vind staan.
#06 is a really pretty light blue colour, as you can see it's more glittery than shimmer. In real life there's much more glitter, but it's hard to see on the pic. Application is great, really nice brush and opaque in one coat, I used 2 on this pic.
 Bovenstaande foto is buiten in het zonnetje zonder flits gemaakt. Hier zie je geen enkele glitter meer! En lijkt de lak zelfs boobbelig op bepaalde plekken. Schijn bedriegt want dat is helemaal niet zo, en er zitten superveel heerlijke glittertjes in deze lak! Oh het enige minpuntje aan deze lak is het verwijderen van de lak, mn handen waren compleet blauw!
Above photo is made outside without flash. As you can see there's no glitter on this pic, and also the polish looks a bit bumpy. But it's not what it looks like, there are so many nice glitters in there! Oh there's one little disadvantage, removing the polish. It's a hell, my whole hands and nails were blue!
Thanks for reading, and enjoy the nice weather outside!
Labels:
LUCIDarling,
swatches
dinsdag 21 september 2010
Nailart on Popsticks #2
Vandaag ga ik weer een nailart op een van mijn popsticks laten zien, ik heb deze nailart ook al een aantal keren op mijn nagels gedaan, dus op het eind zal ik meteen de oude foto's erbij plaatsen zodat jullie kunnen zien dat deze nailart goed te maken is op korte nagels.
Today I'm going to show you another popstick with nailart, I've done this nailart for a few times on my own nails, so at the end I'll show you the old pics with the nailart, so you can see that this nailart is easily done on your own nails.
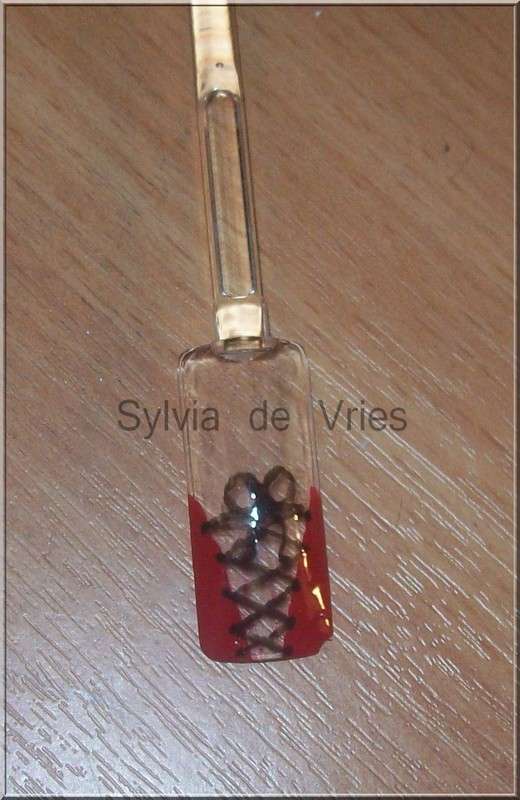 Het gaat dus over het corsetjesnailart. Helaas is de popstick transparant waardoor het effect iets minder mooi lijkt (ook mist er een hoekje uit de popstick) maar wanneer je hem op je eigen nagels maakt ziet het er al veel mooier uit. (Door de kleur van je eigen nagels). De laatste tijd zie ik deze nailart veel voorbij komen, ook in combinatie met Konad.
So it's about above nailart, a nailart with corsets. Too bad the popstick is clear, now it looks not really amazing (yes there is corner gone from the popstick) but when you do it on your own nails it looks much better. (Because of the natural colour of your nails). I see this nailart a lot lately, also with Konad.
Hieronder een paar voorbeeldjes van mijn eigen nagels, let op sommige zijn al 2 jaar oud, en in die tijd had ik nog lange/ongelijke nagels, dat heb ik nu niet meer, maar wilde toch even wat voorbeeldjes laten zien. Ook is niet alles even netjes aangezien de foto's al behoorlijk oud zijn.
Scroll down for the pics of this nailart on my own nails, pay attention: 2 years ago I had long/unequal nails, I don't have that anymore ;), But just wanted to show you the nailart. Oh it's not very neatly, they're very old!
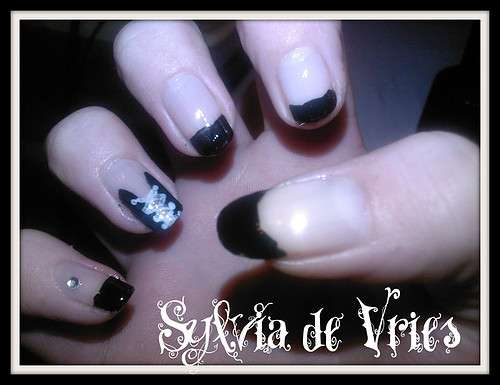 Je kunt de corsetjes ook combineren met een french manicure, zoals ik hierboven gedaan heb, deze foto stamt uit ±2008.
You can combinate the corsets with a french manicure if you like, just like I did above, this pic is from ±2008
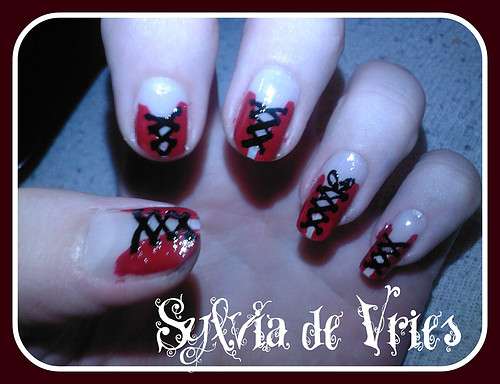 Je kunt ook wat spelen met de strikjes, ik heb hierboven bijvoorbeeld enkel op mn ringvinger een strikje gemaakt. Deze foto komt wederom uit ±2008.
Also you can play with ribbons, above I only made a ribbon on my ringfinger. This pic is also from ±2008.
 Hier heb ik geen enkel strikje gemaakt, zo kun je de nailart dus ook maken. Pfoeh mn pinknagel is hier echt schokkend lang! Deze foto komt ongeveer uit eind 2008.
Here I didn´t make ribbons at all, that´s how you can make the nailart also. Wow my pinknail is really long here! This pic is from the end of 2008.
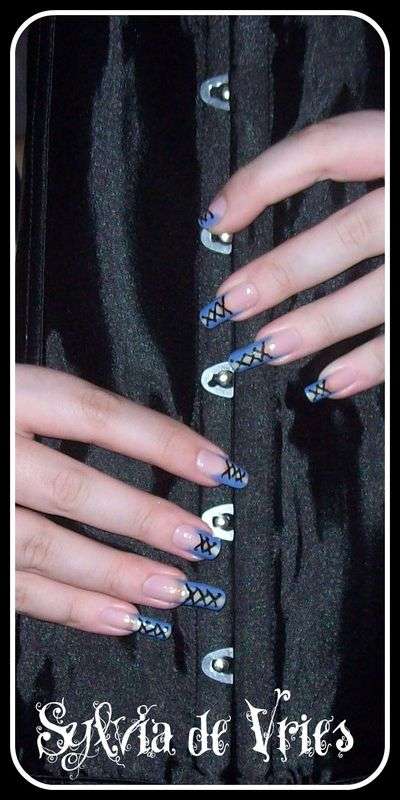 En dit is de laatste keer dat ik corsetjes op mn nagels heb gehad, hier waren mn nagels helemaal een ongelijk zooitje ;) Goed zoals te zien is kun je deze corsetjes dus ook in alle kleuren maken die je wilt. Deze foto komt ongeveer uit begin 2009, niet lang hierna heb ik al mn nagels geknipt en alles gelijk gehouden.
And this was the last time I wore corsets on my nails, my nails were really an unequal messy here ;) But good, as you can see you can make this nailart in every colour you want. This pic is from the beginning of 2009, not long after this one I cut my nails and hold them equal.
Today I'm going to show you another popstick with nailart, I've done this nailart for a few times on my own nails, so at the end I'll show you the old pics with the nailart, so you can see that this nailart is easily done on your own nails.
 Het gaat dus over het corsetjesnailart. Helaas is de popstick transparant waardoor het effect iets minder mooi lijkt (ook mist er een hoekje uit de popstick) maar wanneer je hem op je eigen nagels maakt ziet het er al veel mooier uit. (Door de kleur van je eigen nagels). De laatste tijd zie ik deze nailart veel voorbij komen, ook in combinatie met Konad.
So it's about above nailart, a nailart with corsets. Too bad the popstick is clear, now it looks not really amazing (yes there is corner gone from the popstick) but when you do it on your own nails it looks much better. (Because of the natural colour of your nails). I see this nailart a lot lately, also with Konad.
Hieronder een paar voorbeeldjes van mijn eigen nagels, let op sommige zijn al 2 jaar oud, en in die tijd had ik nog lange/ongelijke nagels, dat heb ik nu niet meer, maar wilde toch even wat voorbeeldjes laten zien. Ook is niet alles even netjes aangezien de foto's al behoorlijk oud zijn.
Scroll down for the pics of this nailart on my own nails, pay attention: 2 years ago I had long/unequal nails, I don't have that anymore ;), But just wanted to show you the nailart. Oh it's not very neatly, they're very old!
 Je kunt de corsetjes ook combineren met een french manicure, zoals ik hierboven gedaan heb, deze foto stamt uit ±2008.
You can combinate the corsets with a french manicure if you like, just like I did above, this pic is from ±2008
 Je kunt ook wat spelen met de strikjes, ik heb hierboven bijvoorbeeld enkel op mn ringvinger een strikje gemaakt. Deze foto komt wederom uit ±2008.
Also you can play with ribbons, above I only made a ribbon on my ringfinger. This pic is also from ±2008.
 Hier heb ik geen enkel strikje gemaakt, zo kun je de nailart dus ook maken. Pfoeh mn pinknagel is hier echt schokkend lang! Deze foto komt ongeveer uit eind 2008.
Here I didn´t make ribbons at all, that´s how you can make the nailart also. Wow my pinknail is really long here! This pic is from the end of 2008.
 En dit is de laatste keer dat ik corsetjes op mn nagels heb gehad, hier waren mn nagels helemaal een ongelijk zooitje ;) Goed zoals te zien is kun je deze corsetjes dus ook in alle kleuren maken die je wilt. Deze foto komt ongeveer uit begin 2009, niet lang hierna heb ik al mn nagels geknipt en alles gelijk gehouden.
And this was the last time I wore corsets on my nails, my nails were really an unequal messy here ;) But good, as you can see you can make this nailart in every colour you want. This pic is from the beginning of 2009, not long after this one I cut my nails and hold them equal.
zondag 19 september 2010
Konad Stamping Polishes
De meesten weten inmiddels wel al wat Konad is en wat je met Konad kunt doen. Voor het stempelen heeft Konad ook een speciale lijn met stempellakjes. Vandaag ga ik jullie laten zien welke stempellakjes er allemaal zijn.
Most of you know what Konad is and what you can do with Konad. For stamping, Konad has their own stamping polishes. Today I'm going to show you all of the stamping polishes from Konad.
 De stempellakjes komen voor in 3 verschillende hoeveelheiden, de grootste hoeveelheid die ze hebben zijn bovenstaande potjes van 12 ml. Zoals je kunt zien zijn er 17 stempellakjes van 12 ml. Als je de afbeelding vergroot (Even klikken) Kun je duidelijk alle namen lezen, zo kun je zelf een beetje bijhouden welke lakjes je hebt. Je ziet hierboven een cirkeltje rond Gold Black, dit houdt dus in dat ik dit stempellakje zelf heb.
The stampingpolishes are in 3 different sizes, the biggest is above 12 ml polishes. As you can see there are 17 stamping polishes in 12 ml size. If you enlarge the pic (just click on it) you can clearly see the names of the polishes, now you can see easily which polish you have. Above you can see a little circle through Gold Black, this means I've got that polish.
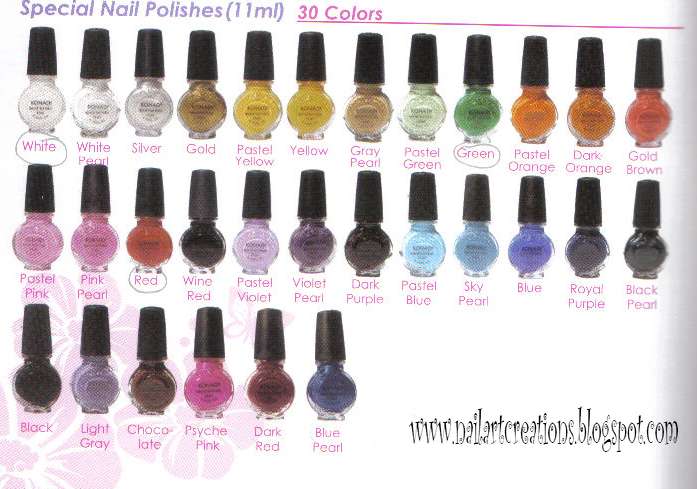 Daarna komen de 11 ml potjes. Dat zijn alle bovenstaande lakjes. Van de 11 ml lakjes zijn er 30, een stuk meer qua keuze dan de 12 ml potjes. Ook hier kun je de foto weer vergroten om beter de namen te kunnen lezen. Je ziet hier een cirkeltje om white/green en Red, deze 3 stempellakjes heb ik dus zelf in dit formaat.
Up next there are the 11 ml polishes. The above polishes. From the 11 ml polishes there are 30 bottles, much more choice than the 12 ml polishes. You can enlarge the pic to read the names better. There is a circle through White/Green and Red, I've got these 3 polishes.
 En als laatste heb je de mini potjes. Deze stempellakjes bevatten elk 5 ml, en zijn er ook in 30 verschillende kleuren, net zoals de 11 ml lakjes. Ook hier kun je weer de foto vergroten om alle namen beter te lezen. Van de minipotjes heb ik White/Red/black (oeps vergeten te omcirkelen) en Blue. De witte en rode zijn al zo goed als op, daarom heb ik hier een back-up van in groter formaat. Wanneer je stempellakjes wilt kopen en je gebruikt voor het eerst konad zou ik je 1 van deze minilakjes adviseren, gewoon om uit te proberen. Wanneer je al een langere gebruiker bent van Konad zou ik de grotere potjes nemen. De minivarianten gaan namelijk heel snel op.
And Last but not least, the minisize bottles. These stampingpolishes are each 5 ml and there are 30 colours, just like the 11 ml polishes. Here you can enlarge the pic too, to read the names better. From the minisize bottles I've got White/Red/Black (Woeps forgot to cirkle) and Blue. The white and red ones are almost finished, so that's the reason I've got those 2 as a back up in a larger size. If you just start with Konad I advise to purchase a minibottle, just to try it out. When you are a real Konaduser, I advise to purchase one of the bigger bottles because the minibottles are really soon finished.
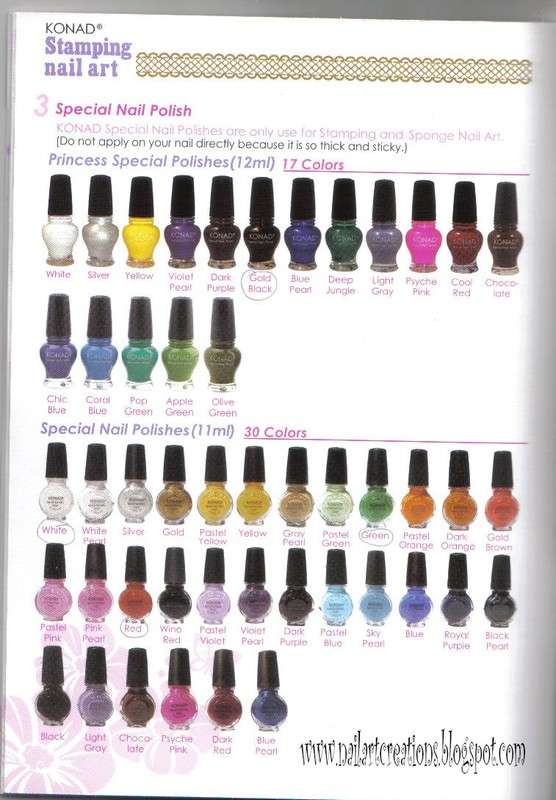 Als laatste nog even een afbeelding met alle 12 ml en 11 ml potjes. Deze afbeelding zou je bijvoorbeeld kunnen gebruiken om al je Konad stempellakjes te markeren.
And very last a picture of all the 12 ml and 11 ml bottles. You can use this one to mark your own bottles.
Om even wat duidelijkheid te geven, al deze afbeeldingen komen uit een minigids van Konad zelf, ik heb deze afbeeldingen gescand uit deze gids dus komen niet van internet. Konad stempellakjes kun je o.a. verkrijgen op: www.enchantra.eu .
To be clear with you, all images are from a mini Konadguidebook, I scanned the images from the guidebook, so they're not from the internet. You can purchase Konad Stampingpolishes o.a. by: www.enchantra.eu .
Most of you know what Konad is and what you can do with Konad. For stamping, Konad has their own stamping polishes. Today I'm going to show you all of the stamping polishes from Konad.
 De stempellakjes komen voor in 3 verschillende hoeveelheiden, de grootste hoeveelheid die ze hebben zijn bovenstaande potjes van 12 ml. Zoals je kunt zien zijn er 17 stempellakjes van 12 ml. Als je de afbeelding vergroot (Even klikken) Kun je duidelijk alle namen lezen, zo kun je zelf een beetje bijhouden welke lakjes je hebt. Je ziet hierboven een cirkeltje rond Gold Black, dit houdt dus in dat ik dit stempellakje zelf heb.
The stampingpolishes are in 3 different sizes, the biggest is above 12 ml polishes. As you can see there are 17 stamping polishes in 12 ml size. If you enlarge the pic (just click on it) you can clearly see the names of the polishes, now you can see easily which polish you have. Above you can see a little circle through Gold Black, this means I've got that polish.
 Daarna komen de 11 ml potjes. Dat zijn alle bovenstaande lakjes. Van de 11 ml lakjes zijn er 30, een stuk meer qua keuze dan de 12 ml potjes. Ook hier kun je de foto weer vergroten om beter de namen te kunnen lezen. Je ziet hier een cirkeltje om white/green en Red, deze 3 stempellakjes heb ik dus zelf in dit formaat.
Up next there are the 11 ml polishes. The above polishes. From the 11 ml polishes there are 30 bottles, much more choice than the 12 ml polishes. You can enlarge the pic to read the names better. There is a circle through White/Green and Red, I've got these 3 polishes.
 En als laatste heb je de mini potjes. Deze stempellakjes bevatten elk 5 ml, en zijn er ook in 30 verschillende kleuren, net zoals de 11 ml lakjes. Ook hier kun je weer de foto vergroten om alle namen beter te lezen. Van de minipotjes heb ik White/Red/black (oeps vergeten te omcirkelen) en Blue. De witte en rode zijn al zo goed als op, daarom heb ik hier een back-up van in groter formaat. Wanneer je stempellakjes wilt kopen en je gebruikt voor het eerst konad zou ik je 1 van deze minilakjes adviseren, gewoon om uit te proberen. Wanneer je al een langere gebruiker bent van Konad zou ik de grotere potjes nemen. De minivarianten gaan namelijk heel snel op.
And Last but not least, the minisize bottles. These stampingpolishes are each 5 ml and there are 30 colours, just like the 11 ml polishes. Here you can enlarge the pic too, to read the names better. From the minisize bottles I've got White/Red/Black (Woeps forgot to cirkle) and Blue. The white and red ones are almost finished, so that's the reason I've got those 2 as a back up in a larger size. If you just start with Konad I advise to purchase a minibottle, just to try it out. When you are a real Konaduser, I advise to purchase one of the bigger bottles because the minibottles are really soon finished.
 Als laatste nog even een afbeelding met alle 12 ml en 11 ml potjes. Deze afbeelding zou je bijvoorbeeld kunnen gebruiken om al je Konad stempellakjes te markeren.
And very last a picture of all the 12 ml and 11 ml bottles. You can use this one to mark your own bottles.
Om even wat duidelijkheid te geven, al deze afbeeldingen komen uit een minigids van Konad zelf, ik heb deze afbeeldingen gescand uit deze gids dus komen niet van internet. Konad stempellakjes kun je o.a. verkrijgen op: www.enchantra.eu .
To be clear with you, all images are from a mini Konadguidebook, I scanned the images from the guidebook, so they're not from the internet. You can purchase Konad Stampingpolishes o.a. by: www.enchantra.eu .
Labels:
Konad
donderdag 16 september 2010
Notd Fantasy Nails
Een paar dagen geleden liet ik jullie Sexy in Black van Essence zien, hierbij zei ik ook dat ik met deze lak een Notd gemaakt had. Vandaag ga ik jullie dus deze Notd laten zien! Het is een beetje een fantasie ideetje, maar het had best een leuk effect!
A few days ago I showed you Sexy in Black from Essence, I told you that I made a Notd with this one, so today is the day I'm going to show you the Notd with Sexy in Black, it's a fantasy manicure, so use your imagination!
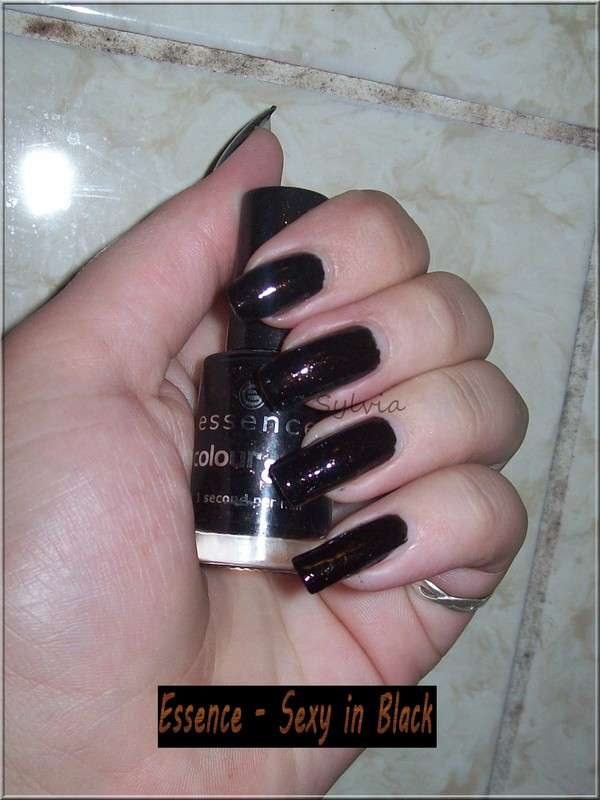 De basislak is natuurlijk al duidelijk, maar toch nog even de foto erbij om het geheugen op te frissen. Voor meer info over deze lak kijk hier!
The basecolour is ofcourse Sexy in Black, but again a pic to clear up your memory! For more information about this polish look here!
 En dit is de Notd, ik heb de technieken van Asami bij haar 'space nails' gebruikt. Dus ipv sponzen deppen met een stukje keukenpapier. Ik wilde niet haar spacenails precies namaken dus heb er mijn eigen draai aan gegeven en er een fantasietje van gemaakt.
And this is the Notd, I used the techniques from Asami's Space nails. So instead of sponging patting with a piece of paper. I didn't want to copy her spacenails, so I used my own ideas in it.
 En hier nog een foto. De lakken die ik gebruikt heb zijn dus: Essence - Sexy in Black (met de Hema matte topcoat, maar ik heb hem weer glanzend gemaakt). Vervolgens heb ik gedept met China Glaze - Him Out (Kaleidoscope collectie) en ik heb met wat nagellijm de blauwe hexagons aangebracht. De blauwe hexagons komen trouwens uit de nailart collectie van Essence. Wanneer je deze in verschillende soorten licht houdt veranderen ze van kleur naar bijv: Geel, Groen, Roze etc. Wil je nou het voorbeeld van Asami zien? Of misschien haar spacenagels namaken (ze zijn echt heel mooi!) Neem dan hier eens een kijkje!
And another picture. The polishes I used are: Essence - Sexy in Black (With the matt topcoat, but I made it shiny again with regular topcoat). Up next I tapped with China Glaze - Him Out (Kaleidoscope Collection) and I glued some blue hexagons on it. The blue hexagons are from the nailart collection from Essence. When you look at them in the light they change colour to: Yellow, Green, Pink etc. Do you want to see Asami's space nails? Or made them yourself (They're absolutely gorgeous! Take a look at her blog here!
Up to the weekend!
A few days ago I showed you Sexy in Black from Essence, I told you that I made a Notd with this one, so today is the day I'm going to show you the Notd with Sexy in Black, it's a fantasy manicure, so use your imagination!
 De basislak is natuurlijk al duidelijk, maar toch nog even de foto erbij om het geheugen op te frissen. Voor meer info over deze lak kijk hier!
The basecolour is ofcourse Sexy in Black, but again a pic to clear up your memory! For more information about this polish look here!
 En dit is de Notd, ik heb de technieken van Asami bij haar 'space nails' gebruikt. Dus ipv sponzen deppen met een stukje keukenpapier. Ik wilde niet haar spacenails precies namaken dus heb er mijn eigen draai aan gegeven en er een fantasietje van gemaakt.
And this is the Notd, I used the techniques from Asami's Space nails. So instead of sponging patting with a piece of paper. I didn't want to copy her spacenails, so I used my own ideas in it.
 En hier nog een foto. De lakken die ik gebruikt heb zijn dus: Essence - Sexy in Black (met de Hema matte topcoat, maar ik heb hem weer glanzend gemaakt). Vervolgens heb ik gedept met China Glaze - Him Out (Kaleidoscope collectie) en ik heb met wat nagellijm de blauwe hexagons aangebracht. De blauwe hexagons komen trouwens uit de nailart collectie van Essence. Wanneer je deze in verschillende soorten licht houdt veranderen ze van kleur naar bijv: Geel, Groen, Roze etc. Wil je nou het voorbeeld van Asami zien? Of misschien haar spacenagels namaken (ze zijn echt heel mooi!) Neem dan hier eens een kijkje!
And another picture. The polishes I used are: Essence - Sexy in Black (With the matt topcoat, but I made it shiny again with regular topcoat). Up next I tapped with China Glaze - Him Out (Kaleidoscope Collection) and I glued some blue hexagons on it. The blue hexagons are from the nailart collection from Essence. When you look at them in the light they change colour to: Yellow, Green, Pink etc. Do you want to see Asami's space nails? Or made them yourself (They're absolutely gorgeous! Take a look at her blog here!
Up to the weekend!
woensdag 15 september 2010
Essence - Return to Paradise Collection
Vandaag heb ik weer wat swatches voor jullie. Dit keer heb ik de Return to Paradise collectie van Essence geswatched. Deze collectie bestaat uit 5 lakjes, helaas heb ik er maar 4, dus ook maar 4 swatches, de laatste kon ik nergens meer vinden, dus helaas. Maar de andere 4 ga ik jullie nu laten zien!
So I've got some swatches for you girls today. This time I swatched the Return to paradise Collection from Essence. This collection has 5 polishes, I only have 4, so only have 4 swatches, couldn't find the last one anymore. But here are 4 polishes!
 Het eerste lakje is Jungle Drum een bruin jelly lakje. Zoals iedereen ondertussen wel weet verafschuw ik bruine nagellak, maar goed er valt vast wel iets leuks mee te doen. Applicatie was prima, na 2 laagjes een mooi dekkend resultaat.
The first polish is Jungle Drum, a brown polish with a jelly finish. As everyone know I hate brown polishes, but good maybe I've got some ideas for this one. Application was fine, after 2 layers a good covering.
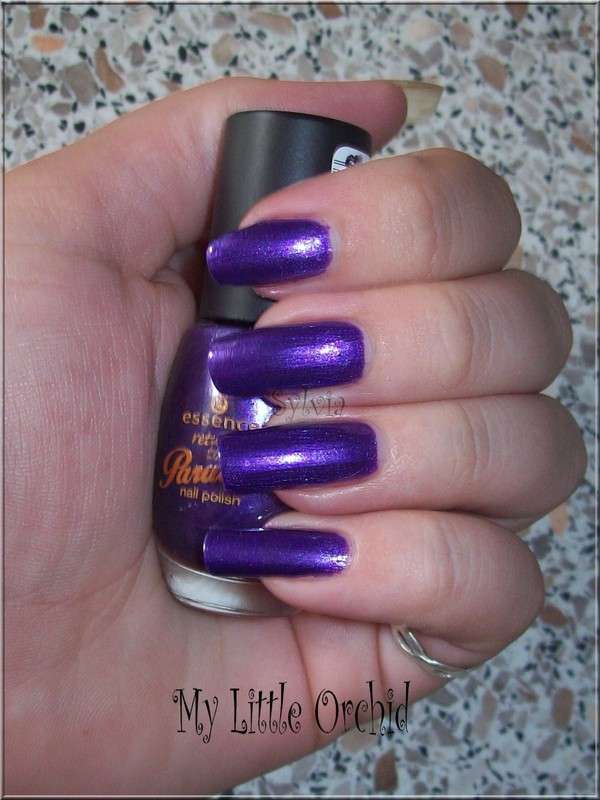 Het tweede lakje is My Little Orchid. Oh deze vind ik prachtig! Éen van mijn favo's uit deze collectie, ik hou van paars en ik hou van shimmer! Dit is een mooi dieppaars lakje met zilveren/blauwe/paarse shimmer. Applicatie was ook weer goed, deze is iets dunner dan Jungle Drum dus vond ik wat lekkerder lakken. Ook hier is 2 laagjes weer genoeg voor een mooi resultaat.
The second polish is My Little Orchid. Oh I love this polish! One of my favourite polishes from this collection, I love purple ánd I love shimmer! This one is a nice deeppurple polish with silver/blue/purple shimmer in it. Application was good, this one is a little bit thinner than Jungle Drum, so it's nice to work with. Again 2 layers is good for a nice result.
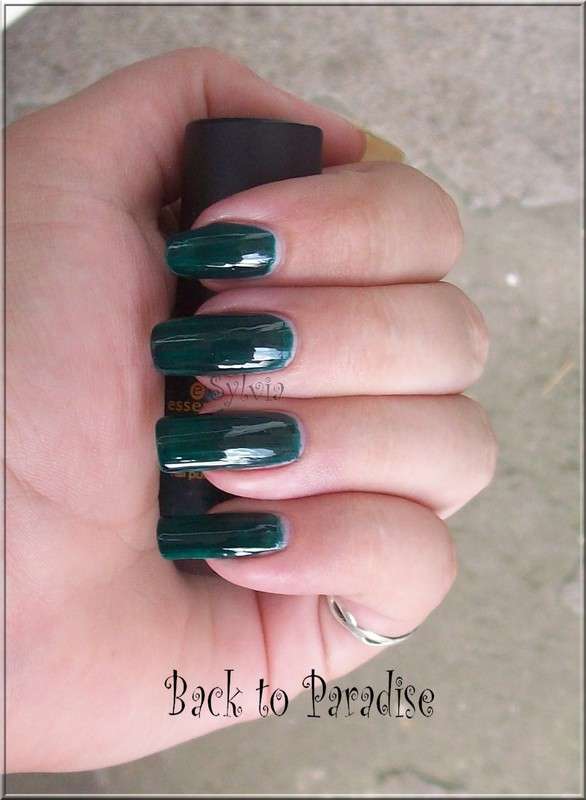 Back to Paradise is het derde lakje, voor deze heb ik maar één woord nodig: Afschuwelijk! Na 3 laagjes zie je nog steeds overduidelijk mn nagels door de lak heen. Heel vreemd aangezien de formule van deze lak helemaal niet zo dun is blijft hij erg sheer. Zonde want misschien is hij dekkend wel erg mooi, ik ga deze in ieder geval een keer proberen over een witte lak, misschien wordt hij dan een stuk mooier. (Als je benieuwd bent naar deze over een witte lak, laat het me ff weten dan zorg ik dat er een post over komt!). Oja, ook dit is een jelly lakje.
Back to Paradise is the third polish, for this one I only need one word: Horrible! I hate it! After 3 coats you can still see my nails through it! Really strange because the formula isn't very thin.. It's normal but still the polish is sheer. Too bad, maybe it's a really nice colour, ah I shall try it above a layer of white polish, maybe the result is better then. ( Are you curious for a swatch above white polish? Let me know, because then I'm going to make a blogpost over it). Oh and this one is a jelly polish.
 Het laatste lakje welke ik heb is Fruit Punch. Ook deze vind ik weer erg mooi, het is een oranje lakje met gele shimmer. Ik heb me echt gek gezocht in mn stash naar een dupe, maar ik heb dus ook geen dupe kunnen vinden, voor mij dus een origineel lakje in mn stash!
The last polish I have is Fruit Punch. I really like this one, it's an orange polish with yellow shimmer in it. I searched for a dupe in my stash, but couldn't find one. So that means it's pretty original in my stash!
Thanks for reading!
So I've got some swatches for you girls today. This time I swatched the Return to paradise Collection from Essence. This collection has 5 polishes, I only have 4, so only have 4 swatches, couldn't find the last one anymore. But here are 4 polishes!
 Het eerste lakje is Jungle Drum een bruin jelly lakje. Zoals iedereen ondertussen wel weet verafschuw ik bruine nagellak, maar goed er valt vast wel iets leuks mee te doen. Applicatie was prima, na 2 laagjes een mooi dekkend resultaat.
The first polish is Jungle Drum, a brown polish with a jelly finish. As everyone know I hate brown polishes, but good maybe I've got some ideas for this one. Application was fine, after 2 layers a good covering.
 Het tweede lakje is My Little Orchid. Oh deze vind ik prachtig! Éen van mijn favo's uit deze collectie, ik hou van paars en ik hou van shimmer! Dit is een mooi dieppaars lakje met zilveren/blauwe/paarse shimmer. Applicatie was ook weer goed, deze is iets dunner dan Jungle Drum dus vond ik wat lekkerder lakken. Ook hier is 2 laagjes weer genoeg voor een mooi resultaat.
The second polish is My Little Orchid. Oh I love this polish! One of my favourite polishes from this collection, I love purple ánd I love shimmer! This one is a nice deeppurple polish with silver/blue/purple shimmer in it. Application was good, this one is a little bit thinner than Jungle Drum, so it's nice to work with. Again 2 layers is good for a nice result.
 Back to Paradise is het derde lakje, voor deze heb ik maar één woord nodig: Afschuwelijk! Na 3 laagjes zie je nog steeds overduidelijk mn nagels door de lak heen. Heel vreemd aangezien de formule van deze lak helemaal niet zo dun is blijft hij erg sheer. Zonde want misschien is hij dekkend wel erg mooi, ik ga deze in ieder geval een keer proberen over een witte lak, misschien wordt hij dan een stuk mooier. (Als je benieuwd bent naar deze over een witte lak, laat het me ff weten dan zorg ik dat er een post over komt!). Oja, ook dit is een jelly lakje.
Back to Paradise is the third polish, for this one I only need one word: Horrible! I hate it! After 3 coats you can still see my nails through it! Really strange because the formula isn't very thin.. It's normal but still the polish is sheer. Too bad, maybe it's a really nice colour, ah I shall try it above a layer of white polish, maybe the result is better then. ( Are you curious for a swatch above white polish? Let me know, because then I'm going to make a blogpost over it). Oh and this one is a jelly polish.
 Het laatste lakje welke ik heb is Fruit Punch. Ook deze vind ik weer erg mooi, het is een oranje lakje met gele shimmer. Ik heb me echt gek gezocht in mn stash naar een dupe, maar ik heb dus ook geen dupe kunnen vinden, voor mij dus een origineel lakje in mn stash!
The last polish I have is Fruit Punch. I really like this one, it's an orange polish with yellow shimmer in it. I searched for a dupe in my stash, but couldn't find one. So that means it's pretty original in my stash!
Thanks for reading!
dinsdag 14 september 2010
Essence - Sexy in Black & Matt

Eigenlijk was het plan om vandaag een Notd te laten zien met deze lak, maar omdat ik zoveel foto's heb en hem ook mat gemaakt had, ga ik er een aparte post over maken. De Notd met deze lak komt dan dus een ander keertje!
I wanted to do a Notd today, but I've got so many pics to show, I decided to make a post about this polish, I made it matt too! So the Notd with this polish is coming soon!

Essence - Sexy in Black
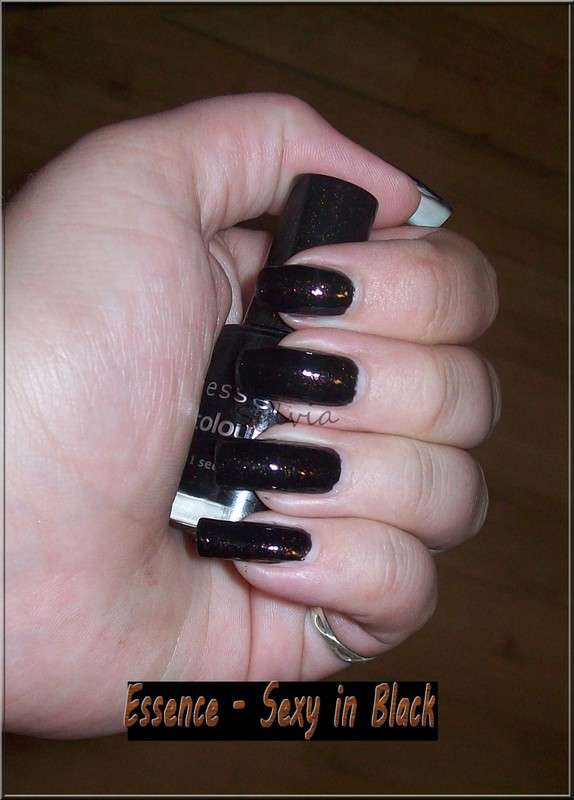 Bovenstaand 2 foto's van Essence - Sexy in Black. Sexy in Black is een zwarte lak met onwijs veel bruine glitter erin. Op de foto's is de glitter iets moeilijker te zien, maar in real life knallen de glitters er echt af! Ik heb deze lak dus ook al ruim 2 jaar, en kom er nu pas achter dat het best een mooie kleur is.. Zo vind je nog eens wat als je je kast opruimt! Had eerst het idee dat hij na zo'n lange tijd vast heel dik geworden was, maar dat viel best wel mee, zeker voor die 2 jaar dat hij al in mn kast ligt. Applicatie was daarom redelijk goed, de lak was wel iets dikkig, maar na 1 laagje echt al een mooi resultaat. Voor de foto heb ik er 2 laagjes van gemaakt.
Above 2 pics from Essence - Sexy in Black. Sexy in Black is a black polish with lots of brown glitters. On above pics it's hard to see the glitters, but in real life they're definitely there! I've got this polish for 2 years now, and I never tried it... But actually it's a really nice polish. That's what I call cleaning up my closet! Application was actually reasonable, the polish is a bit thick, but that's not a big problem, the polish is very old.. You only need one layer, but I used 2 on this pic.
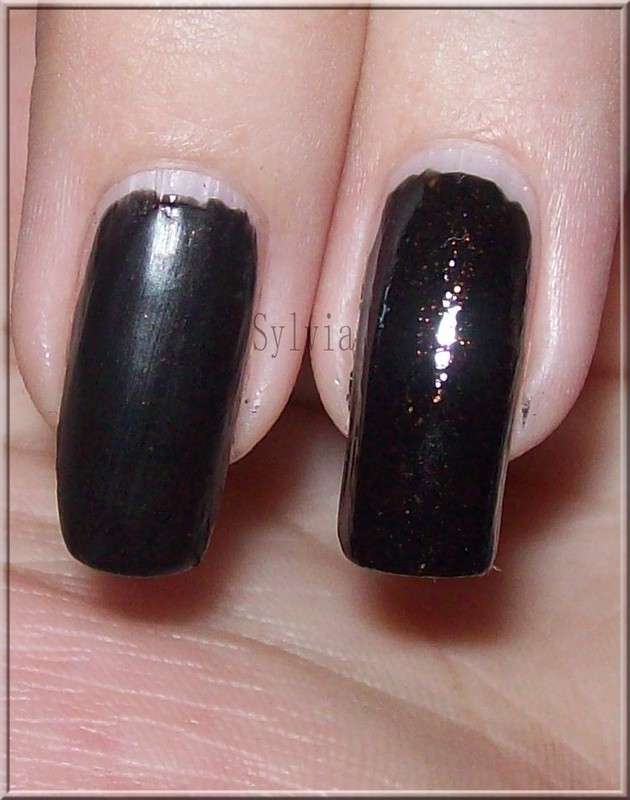 Ik was ook benieuwd hoe deze lak er mat uitzag, dus heb meteen met de matte topcoat van de hema de lak mat gemaakt. Links zie je deze lak mat, rechts glanzend, hoe hij er dus normaal gesproken uitziet. Om eerlijk te zeggen vind ik hem glanzend mooier, wanneer je deze lak mat maakt vallen alle glitters weg.
I was really curious how this polish would be matt. So I took my matt topcoat from Hema and made it matt. On the left side you see Sexy in Black matt, right original. I must admit I like this polish more in it's original way, when the polish is matt all the glitter disappear.
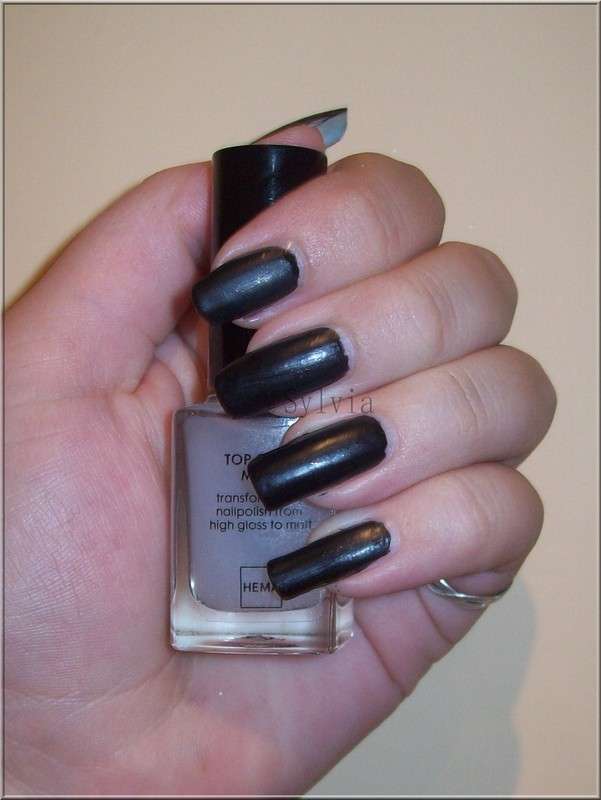 En als laatste dus een foto hoe hij er totaal mat uitziet. Vind hem mat alleen leuk voor een ondergrond voor nailart. Als enkele manicure zou ik deze lak niet mat dragen. Bij mijn Notd heb ik hem uiteindelijk ook weer glimmend gemaakt. Lang leve de topcoat!
And last but not least, all the nails matt. I only like the matt finish for a basecolour for nailart. If you wear this as a complete manicure I wouldn't wear it matt. I made it shiny again in my notd, long life topcoat!
Wat vinden jullie van dit lakje?/So what do you think of this polish?
maandag 13 september 2010
Giveaways from..
Oke aangezien heel veel blogs tegenwoordig giveaways houden, en iedereen wil dat de ander erover blogged, heb ik besloten iedere maand 1 post te besteden aan giveaway alerts. Iedere keer als ik een leuke giveaway tegenkom zal ik deze hier plaatsen, en zal deze post dus blijven updaten. Zo voorkom ik een beetje dat er straks elke maand 20 posts zijn over giveaways. En zo kan ik het meteen een beetje overzichtelijk houden voor jullie! Dus bij interesse neem afentoe een kijkje bij het giveaway topic!
Alright, everyone are having giveaways lately, and everyone wants that the other will blog about it. So I decided to do 1 posts each month with the giveaways. I will update this post every time that I see a nice giveaway. This is because I don't want every month 20 posts with only giveaways, boring! So this is much better! When you're interested in giveaways, take a look at this post sometimes!
The first is from Scandalously Polished. She's having a piggy paint giveaway!! You can win a $15 coupon for their website!
Giveaway ends september 22, and you only have to be a gfg follower! You can join her blog here!
----------------------------------------------------------------
The second is from Mia's Little Corner, she's giving away a nice OPI package.
 You can enter until October 9, and you can enter here. Oh and make sure you take a look at her lovely blog!
----------------------------------------------------------
Scandalously polished is also having a giveaway! She reached her 666 followers, and you can win some cool stuff! You've got to check out her blog for yourself, one of the prices are some polishes from the awakening collection from China Glaze!
 The giveaway is open until 10-10-2010, and you can enter her giveaway here!
-------------------------------------------------------------------------------------
Polishing the Nails is having a giveaway too, you can win a lot of gorgeous prices!
You can enter the giveaway here, and you can enter until october 3th. Oh and make sure you take a look at her blog too, you can translate her blog (because most of the text isn't in english) You can look at her blog here: www.rijah.dk
---------------------------------------------------------------------------------------------------------------------
Sharana's corner is having a giveaway too. So sweet, she's giving away 2 Nfu Oh polishes!
This is one of them:
You can enter the giveaway here! And you can enter until october 29th.
------------------------------------------------------------------------------------------------
Bright Lights, Big Color is having an : I wanna thank you giveaway, so sweet!
You can win a lot of nice prices, one of the prices is a mini OPI package!
For the other prices you can check out her blog, the only thing you've got to do is being a follower!
Check out her blog here!
-------------------------------------------------------------------------------------------------------
You can win a lot of amazing polishes. Read her rules and you can enter here until October 29th.
------------------------------------------------------------------------------------------------
Jackie S of Candy Coated Tips is giving away the China Glaze Awakening set, China Glaze Ghoulish Glow, China Glaze Matte Magic and Sally Hansen Hidden Treasure. Contest ends 8 Oct, and you can enter here.
------------------------------------------------------------------------------------------------
Abonneren op:
Posts (Atom)

